7.01.2013

Moroccan Couscous


This is a tasty, somewhat spicy, veggie packed side.  In an attempt to utilize as many CSA veggies as possible as fast as possible, this recipe was inspired by this week's box.  Cubed squash, onion (my fav) and zucchini paired with some Moroccan inspired spices make this dish really delish!

Servings: 6
Size: 1 cup
Points Plus: 5pp
Level of Difficulty: Easy
Prep Time: 15 minutes
Cook Time: 30 minutes
Rating: 4 stars - Very Good

Ingredient List: 
2 cups peeled butternut squash, cubed
1 yellow onion, diced
1 large zucchini, cubed
1 T. olive oil
1 1/2 stock of your choice
1 T. Smart Balance light butter
1 t. McCormick - Moroccan Seasoning (mixture of cinnamon, cuman, coriander, ginger, cardamom, black pepper, white pepper, red pepper, paprika and turmeric)
1 cup uncooked couscous
4 scallions, white and green parts, chopped
Lettuce and/or spring mix, chopped
Salt and pepper to taste

Directions:
Preheat oven to 375.  Place quash, onion and zucchini on a rimmed sheet pan.  Drizzle with olive oil and salt and pepper to taste. Roast for 20 minutes, string after 10.  Increase oven temp to 400 degrees and roast for an additional 10 minutes.  While veggies are roasting heat stock in a large pan and add McCormick seasoning. Bring to a boil, turn off heat and let steep for 15 minutes.  After 15 minutes bring to a boil again, sprinkle couscous into stock mixture, stir, cover and let stand for 10 minutes.  When veggies are done remove lid from couscous and fluff with a fork.  Add veggies over couscous and toss.  Serve over copped lettuce and top with chopped scallions!

Tip:
For additional protein consider adding some roasted chicken.

XOXO - Katie

6.28.2013

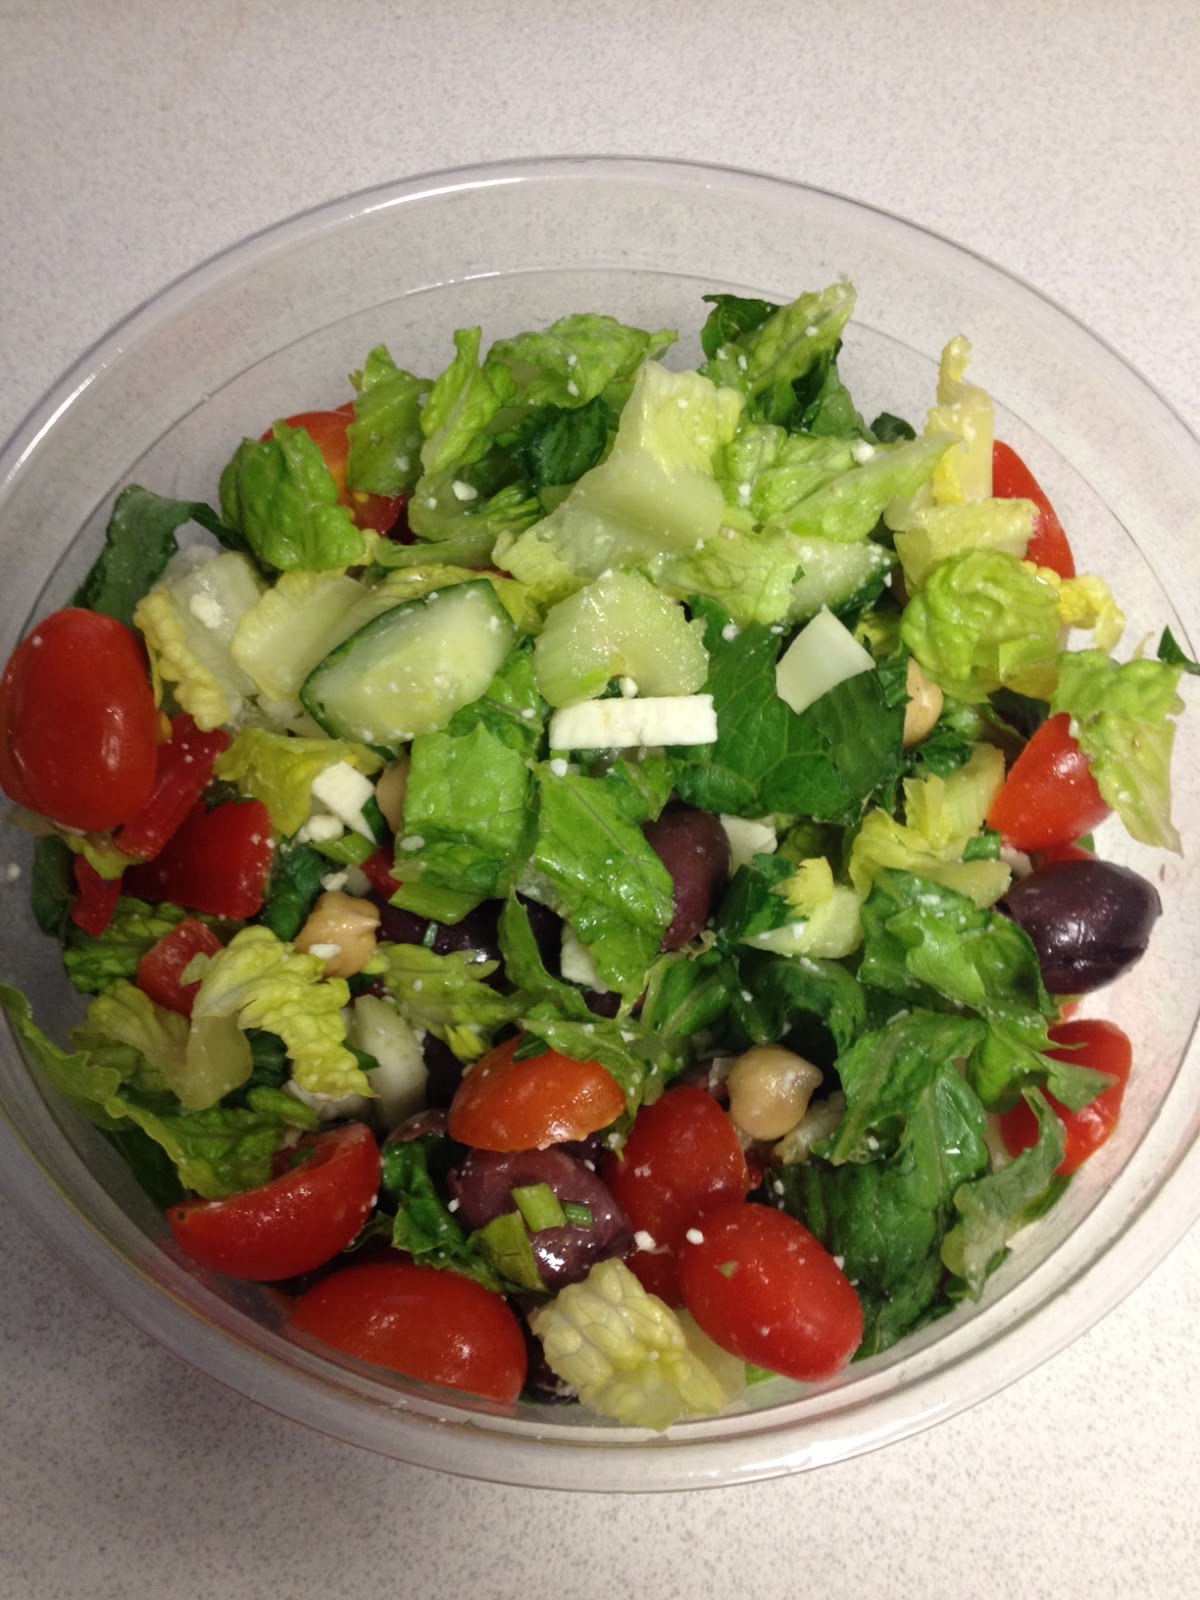
Greek Chopped Salad


A Greek salad is my go to salad – I never get sick of the combination of these ingredients!  Although chopped salads require extra prep since you have lots of veggies to wash and chop, I think they are well worth it and delicious.

Servings:  2
Size:  Main course salad
Points Plus: 6pp (does not include pp value for dressing)
Level of Difficulty:  Easy
Prep Time: 20 minutes
Cook Time:  n/a
Rating: 4 stars – Very good

Ingredient List:
Chopped romaine
1 cup cucumber, chopped
1 cup red bell pepper, chopped
½ cup celery, chopped
1 cup chickpeas, rinsed and drained
1 cup grape tomatoes, halved
½ cup crumbled feta, reduced-fat
12 Kalamata olives, halved

Directions:
Chop up hearts of romaine and plate out portions for two main course salads. Wash and chop up your other veggies (cucumber, bell pepper, celery and grape tomatoes), make sure they are chopped into smaller pieces since this is a chopped salad.  Open a can of chickpeas and rinse and drain.  Slice the olives in half.  Throw everything into a large bowl to mix thoroughly.  Add in the crumbled feta and serve with your favorite dressing – I would recommend some sort of vinaigrette.

XOXO Megan

6.27.2013

Ice Cream Cake


Today is my birthday ya'all!  In celebration, I have brought you a delicious ice cream cake recipe that you can eat for breakfast, lunch and/or dinner in this heat! (in moderation of course) It is loosely based after Dairy Queen's ice cream cake, and also loosely based of this recipe. I served this cake in 85 degree weather, 90% humidity AND outside.  Needless to say I didn't get to snap a photo.  But enjoy the one below from the Food Network that in totally actuality looks similar to mine! (for real)

Servings: 12
Size: 1/12 of cake
Points Plus: TBD
Level of Difficulty: Easy (for real it is, but you have to have patience)
Prep Time: 30 minutes
Chill Time: Overnight
Rating: 5 stars - Excellent!

Ingredient List:
1/2 qu. chocolate ice cream
1/2 qu. vanilla ice cream
4 oz. Mrs. Richardson's chocolate fudge
2 oz. Mrs. Richardson's caramel
1 sleeve Oreos (cream filled center removed)
2 c. heavy whipping cream
4 T. powdered sugar
Patience

Directions:
*This recipe would be 100 times easier if I had a deep freeze.  But I don't, so before doing anything I cleared off the largest spot possible in my side by side freezer. Also, this recipe takes a while (mostly waiting time).  I tried to split up the recipe so that it is easy to understand!
  1. Place a spring form pan in the freezer for about 15 minutes.  At the same time, remove and thaw vanilla ice cream. When pan is cold and ice cream is a little soft, spread 1/2 quart of the vanilla ice cream on the bottom of the spring pan.  Spread it around so that it looks like an ice cream 'cake' and return to freezer for 1 hour.  
  2. While the vanilla ice cream is re-freezing, remove the filling from the Oreos and discard.  Warning!!! Do not do this step when hungry.  You will:
    1. Eat too much of the plain cream filling
    2. Eat too many Oreos. 
  3. Pulse Oreos in your medium sized food processor until chunky, not powdery.  After 1 hour remove the cake from the freezer and sprinkle the Oreos over the vanilla layer.  Gently press them down with a spoon and return the cake to your freezer for 30 minutes.  
  4. After 30 minutes heat up your chocolate fudge so it is soupy.  Remove the cake from the freezer and pour the fudge over the cookies to coat.  Return cake to freezer for 30 minutes.  
  5. After 30 minutes warm up 2 oz of Mrs. Richardson's caramel sauce. Remove the cake from the freezer and drizzle the caramel over the fudge.  Return to freezer for 1 hour. 
  6. 45 minutes later remove your chocolate ice cream from the freezer and let soften.  15 minutes later remove cake from freezer and spread chocolate ice cream over caramel layer.  Return to freezer overnight.  Your spring pan should be full to the brim!  WOW that is a lot of in and out of the freezer, get what I mean about the deep freeze!
  7. ...the next day.  Whip 2 c. of heavy whipping cream and 4 T. of powdered sugar with an electric mixer until very stiff.  Set aside. 
  8. Fill your sink with 2 inches of hot water. Have a serving plate ready to go on your counter.  Gently dip your spring pan into the water for 5 seconds.  Seriously, any more and you will have a mess.  Bring your spring pan over to your plate and slowly open it, allowing the cake to drop onto the serving plate.  Return to the freezer for 1 hour.
  9. After 1 hour remove cake from freezer and frost with whipping cream.  Use your fancy cake decorating skills to pipe around the edges if you would like.  Return the cake to your freezer for 2 hours. This step is very important.  The whipping cream will sort of seal the cake, allowing for it to stand outside of a freezer for longer periods of time (meaning 10 minutes max, this cake does need to be kept in the freezer).  
  10. Remove from freezer a few minutes before serving.  Enjoy!
Tip:
You could also probably make this in a normal 9x13 inch pan.  I would recommend lining the pan with wax paper, making the cake, and then flipping it when done before frosting.  Delish!

Tipx2 - it would be fun to experiment with ice cream flavors with this! Or, if you feel like spending the cash use two types of Ben & Jerry's!  2 pints per layer!

XOXO - Katie

6.26.2013

Zucchini Medley


I love zucchini!  It’s one of my favorite vegetables alongside Brussels sprouts and asparagus.  This side dish is a new way to serve zucchini and is packed with veggies.

Servings: 6
Size:  1/6 of the serving dish
Points Plus: 2pp
Level of Difficulty:  Easy
Prep Time: 15 minutes
Cook Time:  30 minutes
Rating: 4 stars – Very good

Ingredient List:
2 medium zucchini, sliced
1 medium onion, halved and thinly sliced
2 Tbsp. butter
2 medium tomatoes, sliced
½ green pepper, cut into ½ inch slices
2 tsp. oregano
Salt & pepper to taste
½ cup shredded Parmesan cheese

Directions:
Preheat the oven to 350°. Arrange zucchini slices in layers on the bottom of an 8x8 glass baking dish.  Top with onion.  Sprinkle half of the oregano, salt & pepper on top of the veggies.  Place small pats of butter on top of the veggies (1 Tbsp.).  Next, top with tomato slices and finally end with green pepper slices.  Sprinkle the remaining oregano, salt & pepper as well as the last Tbsp. of butter.  Bake for 30 minutes or until the veggies look tender.  Serve with Parmesan cheese sprinkled on top.

Tip:
Make sure you slice the zucchini into thin slices (well all the vegetables actually) - this will allow the veggies to cook all the way through and be tender once the dish is done cooking!
XOXO Megan

6.25.2013

Breakfast Bento Box


I eat some pretty cray (ie: non-traditional) things for breakfast to keep my foods interesting.  My favorite is almost anything mixed with cottage cheese.  Tomatoes, sliced up hard boiled egg, cucumbers, you name it!  Starbucks makes some pretty delicious bento boxes.  They are a mixture of low point and perfectly portioned snacks all in one box made for mixing and matching.  My fav is the chicken and hummus one, but at over $5 per box I rarely want to splurge for this tasty breakfast.  So, I made my own, and even put it in a rectangular glass container so that it felt special and fancy while I was eating it at work!  This is a spin-off of the chicken and hummus box, but as you can imagine the combinations are endless!

***I realize a normal person might eat this meal for lunch, so feel free to try that too!

Servings: 1
Size: 1 bento box
Points Plus: 5pp
Level of Difficulty: Easy
Prep Time: 5 minues
Cook Time: 0 minues
Rating: 4 stars - Very Good

Ingredient List:
3 little cuties
1 T. hummus
1/2 c. 1% cottage cheese
1 c. raw carrots
1/4 whole wheat pita cut into triangles
1 string cheese

Directions:
You really just measure and package people! Imagine, you can really dip everything together, and then eat the little cuties for dessert!

Tip:
Add an egg or 1 T. of peanut butter to increase the protein (and the pp value). As mentioned, the possibilities are endless, but this cute breakfast keeps me full all morning and also makes me feel like I am going to the local coffee shop to pick up a quick start to my day!

XOXO - Katie

6.24.2013

Good Earth Turkey Sandwiches


This is a great lunch recipe and it happens to be my mom’s signature dish!  She loves to make these sandwiches.  A good hearty multi-grain bread works best with this recipe, especially since sandwich is open-faced so you are only eating one slice of bread. 
Servings:  2
Size:  1 open-faced sandwich
Points Plus: 6pp
Level of Difficulty:  Easy
Prep Time: 5 minutes
Cook Time:  5 minutes
Rating: 4 stars – Very good

Ingredient List:
2 slices of multi-grain or harvest bread
2 Tbsp. stone-ground mustard
4 ounces turkey, deli meat
Cucumber, thinly sliced
2 slices provolone, reduced fat

Directions:
Toast the bread slices in the toaster.  Spread a layer of stone-ground mustard on one side of each slice.  Layer on 2 ounces of turkey, top with a layer of thinly sliced cucumber slices.  Finally, top each open faced sandwich with a slice of provolone cheese.  Broil the sandwiches for about 5 minutes or until the cheese is melted.
Tip:
You can really amp up the veggies on these sandwiches if you want.  I normally make them with sprouts, but didn’t find any at the store when I was shopping last.  You can add sprouts, sliced tomatoes, or even green peppers –all without adding any additional points to your meal!
XOXO Megan

6.21.2013

Roasted Cauliflower, Chickpeas, and Olives


Here is a tasty little side dish (or even a veggie meal).  As you know, I love salt, and the combo here of green olives and chick peas works so well! I lightened the below recipe up just a bit from this recipe (also visit that site to see a more tasty looking photo) by totally eliminating the oil. I think you can for sure cut back the oil on most roasting recipes.

Servings: 6
Size: 2/3 cup
Points Plus: 3pp
Level of Difficulty: Easy
Prep Time: 10 minutes
Cook Time: 22 minutes
Rating: 4 - Very Good

Ingredient List: 
1 lb. cauliflower, cut into florets
24 green olives, sliced
8 garlic cloves, coarsely chopped
15 oz. (one can) chickpeas, rinsed and drained
1/2 t. crushed red pepper
1/4 t. kosher salt
3 T. fresh flat leaf parsley leaves

Directions:
Preheat oven to 450

Combine first four ingredients in a small roasting pan.  Sprinkle with salt and pepper and toss well.  Bake at 450 for 25 minutes, or until cauliflower is browned to your liking.  Stir after 10 minute. Garnish with parley and enjoy!

Tip: 
For some strange reason I HATE (which is a strong word) butting cauliflower (and broccoli for that matter) which is weird because I LOVE chopping veggies, even onions (those are my fav!).  Here is a little video that might help your cauliflower chipping skilz.

XOXO - Katie