About foodlove

5.31.2013

Snobby Joes?

Have you ever heard of Snobby Joes? Sloppy Joes more snooty relative?  I saw a friend post this cooking concept on Facebook and had to try.  When making Snobby Joes you sub the meat for lentils.  Now, I don't think these taste like Sloppy Joes, but they do resemble the texture and look.  This recipe is ridiculously low in points plus (pp), and because of that, you could put it on any bread of your choosing to make a tasty meal.  The pp below only include the Snobby Joe part, so remember to add extra points for your choice of bread and toppings (in this case I topped with 2 T. reduced fat cheddar for an extra 1 pp, and light bread for 1pp per slice)

In case you don't know a lot about lentils, they are extremely filling which is why I made the serving size 1/2 cup (or enough for two open faced Snobby Joes).  Also, if you haven't seen this clip from Billy Madison, I suggest you watch it immediately.

Servings: 10
Size: 1/2 cup
Points Plus: 2pp
Level of Difficulty: Medium
Prep Time: 10 minutes
Cook Time: 40 minutes
Rating: 3 stars - Good

Ingredients:
1 cup uncooked lentils, rinsed
4 cups water
1 T. olive oil
1 green bell pepper, diced
1 yellow onion, diced
2 cloves garlic, minced
3 T. chili powder
2 t. oregano
1 t. Kosher salt
2 cup tomato sauce*
1/4 cup tomato paste
2 T. maple syrup
1 T. yellow mustard

Directions:
Place uncooked lentils and water in saucepan and bring to a boil. Cover and let simmer 20 minutes.  Drain and put back into pan.

Preheat oil in medium saucepan sautee onion and pepper about 8 minutes.  Add minced garlic during last minute of sautee. Add veggie mixture to lentils.

Add chili powder, oregano, salt, tomato sauce and tomato paste to lentils and veggies.  Cook on low for about 10 minutes. Add maple syrup and mustard and heat through. 

Turn off heat and let stand covered for 10 minutes.

Tip:
How many times have you opened a can of tomato paste just to toss the leftovers?  I mean, I don't think a recipe exists that calls for a whole can of tomato paste (ok maybe some chillis but you catch my drift). Have you ever seen THIS! It's tubed tomato paste, with a little cap that you can put on to SAVE the paste for it's next use.  I personally think the tubed paste is of higher quality than the can and tastes better. Check it out the next time you are grocery shopping.

*CONFESSION: After making this recipe, writing this post, cleaning up the kitchen and looking back I realized that I accidentally used marinara sauce instead of tomato sauce! Everything above is with tomato sauce, and I think they would taste more like Sloppy Joes if you did. Try it out and let us know what you think!

XOXO Katie

5.30.2013

Graudation Cupcakes

My brother graduated last weekend from St. Olaf and to help with the celebration my mom made these adorable graduation cupcakes.  She and I made a few prototypes to the get the cap and tassel just right, but by the end we had perfected it.  They were delicious too!
Servings:  24
Size:  1 cupcake
Points Plus: 8pp
Level of Difficulty:  Medium
Prep Time: 1 hour
Cook Time:  20 minutes
Rating: 4 stars – Very good

Ingredient List:
1 box of fudge cake mix
1 cup mini semi-sweet chocolate chips (set aside 1 Tbsp. for later)
Vanilla frosting
24 mini Reese’s peanut butter cups
24 Ghirardelli dark chocolate squares
24 M&Ms
One decorative tassel


Directions:
Prepare the fudge cake mix according to the directions on the box.  Add in the cup of mini chocolate chips into the cupcake batter.  Line a regular muffin tin with paper or tin liners. Fill each cupcake liner about 2/3 full.  You want your cupcakes to be on the small side since you will be adding frosting and the graduation cap.  Ideally the cupcakes will just come to the top of the cupcake liner once baked. Bake the cupcakes according to the box, probably about 18-20 minutes, depending on your oven.  Since you are making smaller cupcakes you should be able to get 24 cupcakes in total.  While the cupcakes are baking, in a small bowl, melt 1 Tbsp. of mini chocolate chips.  You will use this chocolate as a glue to attach and assemble the graduation cap. 
Once the cupcakes have cooled, frost each with a generous amount of frosting per cupcake.  To assemble the graduation cap, first put a small dab of chocolate glue on the top of an upside down mini Reese’s peanut butter cup (the larger surface area should be on the bottom), affix the Ghirardelli square on top.  The chocolate square should also be upside down with the flat, smooth side facing up.  Next, dab a very small amount of chocolate glue to the middle of the Ghirardelli square – attach a few strands of tassel (we found a decorate tassel and cut it apart to make smaller tassels), then add more chocolate to affix a single M&M on top. Serve at your party and hopefully people are impressed with your creativity! 
Warning:  Don’t EAT the tassel! J
Tip:
Creative cupcakes can be a really big hit for any sort of party – graduation, housewarming, holiday/seasonal, etc. We made these graduation cupcakes in St. Olaf colors – gold and black (well chocolate), but you could easily adapt to different school colors.
XOXO Megan

5.29.2013

Broiled Cod with Chipotle Creme

After a weekend of eating out, eating unhealthy, and eating pretty much whatever we wanted, I decided to take it down a notch and make a light Memorial Day dinner. I have wanted to try making fish tacos forever, and landed on cod, a light flaky white fish.  After some internet research (my fav!) I came up with a good spice mixture and sauce for this Mexican inspired meal. In an effort to lighten things up a little more I opted to skip the tortillas and just serve the fish baked with a side of cilantro lime rice. You could also top with traditional fish taco fixings, red onion, tomato, cabbage, shredded radishes, exc!

Servings: 4
Size: 4oz fish
Points Plus: 4pp
Level of Difficulty: Medium
Prep Time: 5 minutes
Cook Time: 7 minutes
Rating: 4 stars - Very Good

Ingredient List: 
1 lb Atlantic cod
1 T. olive oil
1 t. kosher salt
1/4 t. black pepper
1/8 t. garlic powder
1/2 t. paprika
1/4 t. chili powder
1 lime
1/2 c. light sour cream
1-2 t. chipotle peppers in adobo sauce (sauce only)
Cilantro for garnish

Directions:
Turn oven to broil and place oven rack a few inches from the flame. Line a cookie sheet with tin foil and lay cod on foil. Pour olive oil over cod and brush to cover evenly. Mix salt, pepper, garlic powder, paprika and chili powder. Sprinkle spice mixture evenly over fish. I ended up only using about half of the spice mixture, so feel free to do the same depending on how spicy/salty you would like it. Squeese the juice from one lime over fish. Place cod under the broiler and cook until flaky, for me this was about four minutes. While fish is cooking mix sour cream and chipotle pepper sauce.  When fish is cooked remove from oven and top with 2 T. chipotle cream mixture.  Garnish with cilantro.

Tip: 
With summer on it's way you could easily grill this fish outside.  

XOXO Katie

5.28.2013

Donut Kabobs

Looking for something FUN to serve at your next brunch?  Donut kabobs are a perfect little treat.  I served these for Easter brunch this year and they were a hit with my family.  These are great to serve at either a wedding or baby shower too.  Easy entertaining!
Servings:  As many as you need
Size:  One kabob
Points Plus: 3 pp
Level of Difficulty:  Easy
Prep Time: 10 minutes
Cook Time: n/a
Rating: 4 stars – Very good

Ingredient List:
Donut holes
Strawberries
Blackberries
Skewers

Directions:
Wash the strawberries and blackberries.  Slice the strawberries in half.  Assemble each skewer, alternating each fruit type along with the donut holes.  Feel free to use whatever type of donut hole you prefer – glazed, cinnamon sugar or powdered (I prefer glazed, and they are the least messy :)).
Tip:
Just like the fruit kabobs I posted about a month ago, these kabobs can easily fit the color scheme of your party, shower or brunch.  Switch out what fruit you use to match the colors or theme of your gathering!
XOXO Megan

5.27.2013

Linguine with Shrimp Scampi

The combination of shrimp and lemon is so refreshing, and so spring. Even though we are on a very long rain streak here in MN, I would still like to hope spring (and maybe even summer?) is on it's way. I mean it IS Memorial Day and all.  This dish is really simple, pair it with a salad and you have a quick and decadent meal.

Servings: 4
Size: 1/4
Points Plus: 10pp
Level of Difficulty: Medium
Prep Time: 15 minutes
Cook Time: 15 minutes
Rating: 4 stars - Very Good

Ingredient List:
Kosher Salt (yum!)
Fresh ground pepper
8 oz. whole wheat linguine
1 T. butter
1 T. olive oil
3 T. minced garlic
1 lb. large shrimp, peeled and deveined
3/4 c. fresh parsley
Grated zest of one lemon
1/2 c. freshly squeezed lemon juice (2 lemons)
1/4 t. red pepper flakes
Pinch of shredded Parmesan

Bring a pot of water to a boil.  Add a pinch of kosher salt and linguine and boil according to package directions.

In another large pan (dutch oven), melt butter and heat oil over medium-low heat. Add garlic and saute for one minute. Add shrimp, another pinch of salt, and pepper.  Saute until shrimp has just turned pink (about 2 minutes per side). Remove from heat, add parsley, lemon zest, lemon juice, and red pepper flakes. Toss with  pasta and serve! Add a pinch of parm if you would like.

WARNING: The lemon proportions for this recipe make the lemon flavor pretty strong.  If you would prefer a more subtle lemon flavor cut the juice and zest in half.

Tip: I like to buy deveined shrimp, mainly because the concept of veining shrimp grosses me out. I do however like to peel my own shrimp, I think the kind you have to peep seems fresher than that kind that is already peeled.  Happy Memorial Day!

XOXO - Katie

5.24.2013

FOLLOW US!

Click 'Join This Site' to FOLLOW US! (in the right, hence the arrow)!!!
You will receive a delicious email notification every time we post!

Fresh Basil & Spinach Salad

Making your own dressing makes such a difference, and is usually easier than you might think. This is my favorite salad of all time, combining spinach, warm egg and fresh basil and green beans.

Servings: 4
Size: 1/4
Points Plus: 4pp
Level of Difficulty: Easy
Prep Time: 5 minutes
Cook Time: 10 minutes
Rating: 5 stars - Excellent

Ingredient List:
Salad:
1 1/4 c. 1-inch pieces of green beans
3 cups baby spinach
1 cup torn basil leaves
2 hard - cooked eggs, coarsely chopped

Dressing: 
3 T. olive oil
1 t. balsamic vinegar
1 t. fresh lemon juice
1/2 t. salt
1/2 t. ground pepper

Directions:
Heat 1 inch of water to boiling, add beans. Cook 7 minutes and drain. Mix all dressing ingredients in a shaker and chill until ready to serve. Place beans, spinach and basil in a bowl. Add vinaigrette, toss until evenly coated.  Add eggs and then dressing, toss gently.

Tip:
Try buying a basil plant from the store, using the leave off it, and then setting it in your window.  The plant should regenerate soon and you can enjoy fresh basil all the time (if you are good at keeping plants alive :) Enjoy!

XOXO Katie


5.23.2013

Baby Shells & Asparagus in Marinara

This week has been a busy one and has left me with little time to dedicate to the kitchen.  I found this recipe on Skinnytaste and knew it would be a quick meal to bring together.  The recipe can easily adapt into more servings if need be – just increase the amount of pasta you boil as well as the marinara sauce.  If you love asparagus as much as I do, I would even increase asparagus spears if you are making this for more than 4 servings.

Servings:  4
Size:  1 ¼ cups
Points Plus: 7 pp
Level of Difficulty:  Easy
Prep Time: 5 minutes
Cook Time:  15 minutes
Rating: 3 stars – Good

Ingredient List:
8 oz small pasta shells
1 bunch thin asparagus, tough ends removed
1 ½ cups marinara sauce
¼ cup Pecorino Romano cheese
Salt and pepper to taste

Directions:
Bring about 4 inches of water to boil in a large pot.  Once your water is boiling, add asparagus and cook for about 3 minutes until the spears are just tender.  Drain the asparagus spears and chop into small, bite-sized pieces for the pasta dish.  Bring another large pot of water to boil, make sure to salt the pasta water.  Cook the pasta until al dente.  Meanwhile, heat up 1 ½ cups of marinara sauce in a small saucepan.  When your pasta is done cooking, reserve a ¼ cup of pasta water.  Return the pasta to the large pot, toss in the heated marinara sauce and asparagus pieces.  Use the reserved pasta water as needed to help loosen up the sauce.  Serve in pasta bowls and top with fresh salt and pepper and grated cheese.
Tip:
The original recipe calls for homemade marinara sauce.  I can only imagine how much better this would have tasted had I made my own sauce.  However, I was short on time and decided to just grab a jar of the store-bought kind instead.  I used Newman’s Own marinara which was quite good!  As leftovers, the pasta had absorbed a lot of the sauce so I would recommend you add some extra marinara to your leftover servings.
XOXO Megan

5.22.2013

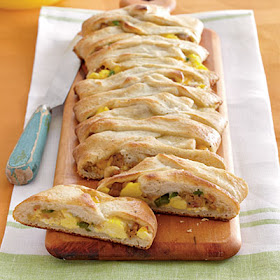
Jalapeño, Sausage & Egg Breakfast Braid

I love to find new breakfast recipes to try out!  I came across this recipe in Cooking Light and tested it out for a summer cabin trip a few years ago.  It’s easy, yet looks pretty impressive, and sounds like it too (breakfast braid sounds kind of fancy to me at least!).  This breakfast dish quickly became a favorite and is a go-to staple if I’m having company and I want to serve something for breakfast or brunch.

Servings:  8
Size:  1/8 of the breakfast braid
Points Plus: 6 pp
Level of Difficulty:  Medium
Prep Time: 20 minutes
Cook Time:  15 minutes
Rating: 5 stars – Excellent

Ingredient List:
1 can refrigerated pizza crust dough
Cooking spray
1 Tbsp. olive oil
¼ cup onion, chopped
4 oz. chicken sausage with jalapeños, chopped
2 large eggs, lightly beaten
½ cup shredded Monterey Jack cheese
¼ cup shredded cheddar cheese
¼ cup jalapeño peppers, chopped and seeded
1 large egg white, lightly beaten

Directions:
Preheat oven to 425°. Unroll the pizza dough onto a baking sheet coated with cooking spray.  Shape dough into a 15x10 inch rectangle.  Heat oil in a large skillet over medium heat.  Add the onion and sausage; cook about 10 minutes or until lightly browned. Stir in the eggs, cook another 1-2 minutes or until the eggs set.  Remove from heat.  Sprinkle Monterey Jack cheese lengthwise down the center of the dough, leave about a 2 ½ inch boarder on each side.  Spoon the egg/sausage mixture evenly over the cheese.  Sprinkle cheddar cheese on top of the egg mixture; top with jalapeño peppers.  Make 2 inch long diagonal cuts about 1 inch apart on both sides of the dough to within ½ inch of the filling.  Arrange the strips over the filling, alternating sides to make the appearance look like a braid.  Press the ends to seal.  Brush the top of the braid with egg white to ensure a nice browned crust.  Bake for 15 minutes or until golden brown.  Let stand for 5 minutes before cutting into slices.
Tip:
To make the cuts in the pizza dough to form the braid, kitchen scissors work REALLY well!  Simply snip out even strips to make your braid.  The scissors will help the dough for tearing or getting stretched out so you end up with a nice looking braid to serve your company!
XOXO Megan

5.21.2013

Blueberry Stuffed French Toast

Brunch! I hosted a brunch this past weekend and served this amazing blueberry stuffed french toast.  I originally had this recipe at a bridal shower, and have been thinking about it ever since....(and that was over a year ago).  The egg base if not too sweet and goes SO WELL with the blueberry topping.  When making the topping you cook half of the berries (you could use any fruit!) until they are soft, then add the second half at the end.  This creates two different berry textures which make the dish so much more interesting.  This re-heats up well too, and I am sure the topping would be amazing on ice cream :)

Also, in case you didn't know, making an egg dish that has to sit overnight is so ridiculously wonderful and easy. I made two overnight egg dishes and it took me less than 15 minutes.  Just pop them in the oven in the morning, stress-free entertaining!

Servings: 16
Size: 1/16 of 9X13 inch baking dish
Points Plus: 7pp
Level of Difficulty: Easy
Prep Time: 10 minutes!
Cook Time: 1 hour, also must sit overnight
Rating: 5 stars - Very Good


Instructions:
I copied the recipe word for word (except smaller servings), so here you go!

Tip: 
The recipe asks for cubed cream cheese.  I don't really know how you would cube cream cheese unless it was frozen, so I just held it with one hand and broke off tablespoon sized chunks, distributing evenly over the bread mixture. With clean hands of course!

XOXO - Katie

5.20.2013

Roasted Vegetable & Refried Bean Tostadas

As I was going through old magazines, I came across this easy recipe from Real Simple.  This is a great meatless meal that is full of ingredients and will definitely leave you feeling full.

Servings:  4
Size:  2 tostadas
Points Plus: 7 pp
Level of Difficulty:  Easy
Prep Time: 15 minutes
Cook Time:  35 minutes
Rating: 4 stars – Very Good

Ingredient List:
10 oz. button mushrooms, trimmed and quartered
2 zucchini, thinly sliced
1 large red bell pepper, cut into 1 ½ inch pieces
2 Tbsp. olive oil
Kosher salt
Black pepper
8 corn tortillas
1 15 oz. can refried beans
4 oz. cheddar cheese, reduced-fat, shredded

Optional (these are not calculated into pp value):
Fresh cilantro, chopped
Light sour cream
Hot sauce

Directions:
Preheat oven to 450°.  On a large, rimmed baking sheet, toss the mushrooms, zucchini and peppers with 1 Tbsp. olive oil.  Generously season the veggies with salt and pepper.  Roast the veggies, tossing once hallway through, until they are tender (about 20-25 minutes).  Place the tortillas on baking sheets.  Lightly brush each tortilla with olive oil, then spread with a generous layer of refried beans.  Top each tortilla with ½ ounce of cheddar cheese.  Bake the tostadas until the cheese is melted, about 5-7 minutes.  Top each tostada with roasted veggies, dividing evenly among all 8 tostadas.  Serve with sour cream, fresh cilantro or hot sauce if want.
Tip:
A really handy tool that works great for spreading the refried beans is Pampered Chef’s small spreader.  I love Pampered Chef products!  All of their products are great quality and they make such a variety of useful kitchen tools.  Check them out!
XOXO Megan

5.17.2013

Sweet & Sour Chicken

You will not believe this sweet and sour chicken is homemade!  It honestly is exactly the same as the breaded kind you would get in a restaurant  but waaaaaay more healthy.  There are several radical and unique things about this chicken.
1) You make your own sweet and sour sauce, which is actually very easy.
2) This chicken looks breaded.  This chicken TASTES breaded.  But this chicken isn't breaded!  The breaded effect is made by dipping the chicken cubes in cornstarch and egg, and then frying them slightly before baking them slowly with the sauce.  This slow bake + the sticky and sweat sauce + the egg is a truly amazing process to watch in the oven, so turn on the light! This will easily become a weekly favorite. I adapted the below recipe from here.

Servings: 4
Size: About 1 cup
Points Plus: 7pp
Level of Difficulty: Medium
Prep Time: 15 minutes if chicken is defrosted
Cook Time: 1 hour 5 minutes, this includes frying and baking
Rating: 4 stars - Very Good

Ingredients
Chicken
1 lb boneless chicken breasts
Salt and pepper to taste
1 cup cornstarch (you should have about 1/2 cup leftover)
2 eggs, beaten
Cooking spray or MISTO with EVOO

Sauce
1/3 cup sugar
2 T. ketchup
1/2 cup white vinegar
1/2 t. soy sauce
1/2 t. garlic salt

Instructions
Preheat oven to 325 degrees. Rinse chicken and cut into 1 inch cubes. Season with salt and pepper to taste. Prepare one bowl of egg and one bowl of cornstarch. Dip chicken into the cornstarch to coat then dip into the egg.  Spray a non-stick skillet and cook chicken until browned but not cooked through. Place the chicken in a baking dish. Wisk together sauce and evenly pour over chicken. This would be especially helpful. Bake for one hour, stirring every 15 minutes. Don't feel like you have to serve with an Asian inspired side.  I have paired with any steamed veggie, TJ's Harvest Grains Blend or even on it's own!

Tip:
When sauteing the chicken don't crowd it.  Fry it in batches so that the chicken pieces don't touch, this will make the browning process a lot smoother!

XOXO Katie

5.16.2013

White Chocolate Snickerdoodle Pudding Cookies

It’s important to remember that it’s totally okay to indulge a little every once in a while!  I wouldn’t recommend you make these weekly by any means... especially because they are so good it will be hard to stop eating these cookies. :)  I made these to bring into work to share with my coworkers. They loved them!  This is one of my many recipes I have pinned on my ‘desserts’ board on Pinterest.  I was intrigued that these cookies had instant pudding mix as one of the ingredients.  Apparently pudding cookies have become really popular in the past year or so, who knew??
Yield:  4 dozen
Points Plus: 3 pp for one cookie 
Level of Difficulty:  Easy
Prep Time: 15 minutes
Cook Time:  10-12 minutues per batch
Rating: 4 stars – Very good

 Ingredient List:
1 cup unsalted butter
¾ cup brown sugar
¼ cup white sugar
1 3.4 oz package white chocolate instant pudding mix
2 large eggs
1 tsp. vanilla extract
2 ¼ cups all-purpose flour
1 tsp. baking soda
½ tsp. salt
2 cups white chocolate chips
1 tsp. cinnamon
1/3 cup cinnamon sugar (used to roll cookies in before baking)


Directions:
Preheat the oven to 350°.  Lightly spray cookie sheets with cooking spray.  Cream together the butter and brown and white sugars.  Add in the eggs, one at a time; make sure they are mixed well.  Next, add in the instant pudding mix, vanilla, flour, baking soda, salt and cinnamon.  Use a spatula to make sure you mix in all the dry ingredients thoroughly.  Fold in the 2 cups of white chocolate chips with the spatula.  Scoop out the cookies (about 3 Tbsp. per cookie), roll into a ball and then roll in the cinnamon sugar to evenly coat each cookie.  Place on the cookie sheets about 2 inches apart from each other.  Bake for 10-12 minutes, until slightly golden and just set in the middle. 
Note: I chose to make my first dozen cookies rolled in cinnamon sugar, but I did all others rolled in just white sugar.  I thought the cinnamon sugar was a little too overpowering for my taste.

Tip:
To keep your number of cookies you eat in check, plan to bring ALL of them into work to share and keep them at work in tupperware! That way you won't be tempted by having dozens of cookies at home AND your coworkers will appreciate your generosity. :)

XOXO Megan

5.15.2013

Veggie Cajun Pasta

Have you every heard of a SLURRY??!?!?!  It is a way to thicken up stuff (soup, sauces, exc.) without adding heavy cream, massive amounts of flour or cornstarch.  Slurry's are the bomb!  Anyways, this recipe calls for a slurry made with a just 1 Tablespoon of flour, cream cheese and milk.  It makes for a really creamy pasta sauce.  I altered Skinnytaste's recipe by omitting the meat and kicking up the veggies.  This is a great dish when you are craving spicy pasta!

Servings: 2
Size: about 1 1/2 cups
Point Plus: 8pp
Level of Difficulty: Medium
Prep Time: 20 minutes
Cook Time: 15 minutes
Rating: 4 stars - Very Good

Ingredient List:
3 ounces uncooked whole wheat pasta
2 tsp Cajun seasoning (more or less to taste)
1 teaspoon olive oil
1 medium red bell pepper
8 oz fresh mushrooms, sliced
1/2 onion, sliced
2 cloves garlic, minced
1 medium tomato, diced
1 cup chicken stock
1/3 cup skim milk
1 tablespoon flour
3 tablespoon light cream cheese
2 shallots
Salt and pepper to taste
Garlic powder

Directions:
Prep all veggies. In your small food processor make slurry by combine milk, flour and cream cheese. Set aside.  Prepare pasta in water according to package directions.  Add olive oil to a large skillet and sautee bell pepper, onions and garlic, about five minutes on low heat.  Add mushrooms and tomato and suatee 3-4 more minutes.  Season with salt, pepper and garlic powder.  Add stock and pour in slurry.  Stir and let boil, about 3 minutes.  Sauce should thicken slightly.  Add Cajun seasoning.  When pasta is cooked add to veggie slurry mixture and mix together.  Let simmer until the sauce reaches your desired thickness.  I added a sprinkle of parm (see photo) but I don't think you need to.  The flavor of this is so GOOD!

Tip: 
If you don't have a blender, food processor or anything that you can mix the slurry in, I would suggest using room temp cream cheese and putting three slurry ingredients into a dish with a lid.  Mix with a fork and then shake so that the slurry gets a little bubbly.  Then, go buy a food processor, blender or other mixing item.  I have a food processor obsession, and I would highly recommend this tiny four cuper for dishes such as this!

XOXO Katie

5.14.2013

Maple Glazed Salmon with Brussels Sprouts

Salmon is quick and easy to bake in the oven; and adding a delicious glaze to the top can really increse the flavor of your fish.  Pair it with Brussels sprouts (one of my FAVORITE veggies) and you've got an easy, healthy dinner on your hands!  You can substitute whatever veggie you want on the side, but honestly I cannot get enough of roasted Brussel sprouts.  They are so delicious!

Servings:  4
Size:  ¼ of the cooked salmon fillet
Points Plus: 10 pp
Level of Difficulty:  Easy
Prep Time: 10 minutes
Cook Time:  25 minutes
Rating: 3 stars – Good
*Recipe from Real Simple
Ingredient List:
1 pound Brussels sprouts, trimmed and halved
½ large red onion, cut into 1 inch wedges
1 Tbsp. olive oil
Kosher salt
Black pepper
2 Tbsp. maple syrup
2 Tbsp. whole-grain mustard
1 ½ pounds salmon fillet, cut into 4 pieces

Directions:
Preheat the oven to 450°, with the racks in the upper and lower thirds of your oven.  On a rimmed cookie sheet, toss the Brussels sprouts and onion with the oil.  Sprinkle salt and pepper over the veggies.  Roast on the bottom rack, tossing occasionally with tongs until they are golden and tender (about 15-20 minutes).  In a small bowl, whisk together the maple syrup, mustard and ¼ tsp each of salt and pepper.  After the veggies have been roasting for 10 minutes, place the salmon in a glass 9x9 baking dish.  Brush the maple mixture over the top of the salmon fillets.  Roast the salmon on the top rack until cooked through, about 15 minutes.  Serve with lemon wedges if you prefer.
Tip:
The original recipe calls for skinless salmon fillets.  I usually buy the packaged fresh fillets at my local grocer that have skin on the bottom.  Rather than struggle to cut off this skin before it’s cooked, just bake the salmon as the directions say above.  Once your salmon is cooked, the fish will literally peel away from the skin on its own.  Just be careful to avoid any fish scales/skin on the pieces you will be serving.

XOXO Megan