6.30.2014

Creamy Spring Pasta

Well now that it is officially SUMMER it is time to use up some of those spring veggies! Asparagus and spring peas come together in this tasty, creamy pasta.  This recipe is perfect for a slow weekend dinner - to only be eaten while sitting outside on your patio!

Servings: 5
Serving Size: 1 cup
Points Plus: 8pp
Prep Time: 10 minutes
Cook Time: 20 minutes
Level of Difficulty: Easy

Ingredients
1 bunch of asparagus, trimmed and cut into 2 inch pieces
1 cup peas, fresh or frozen
8 oz uncooked whole wheat pasta, any type
1 t olive oil
1/3 cup onion, chopped
1 T flour
1/3 cup chicken stock
1 cup fat free milk
3 oz reduced fat cream cheese
1 oz Parmigiano-Reggiano cheese
Kosher salt + black pepper
Fresh parsley

Directions
Bring a stock pot of water to a boil. When the water is bubbling add your asparagus and peas.  Cook them about 3 minutes, until crisp but tender.  Remove your veggies from the water and rinse them with cold water.

Bring another stock pot of water to a boil and cook pasta according to package instructions, until cooked to your liking.  Drain and set aside.

Add 1 t oil to a large skillet.  Add chopped onion and garlic cloves and cook for about 3 minutes, until tender.  Put your flour in a small bowl and gradually whisk in chicken broth.  Add the broth mixture and milk to your skillet and whisk constantly, bringing the mixture to a boil. Reduce heat to medium and cook the sauce for about 1 minute, until the sauce has thickened.  Remove sauce from the heat, add cheese, salt and pepper.  Add pasta to skillet along with asparagus and peas.  Toss until combined! Top with fresh parsley and enjoy.

Tip
Feel free to add other veggies to this pasta.  Matchbook cut carrots

XOXO - Katie

Recipe inspired by Cooking Light.

6.27.2014

Blueberry Basil Smoothie

Basil?!? In a smoothie?!?  Who would have thought that the flavor combo would be delish! I am anxious to try adding basil to other smoothie flavor combos, but for now this one is a great place to start (and it's pretty, which is awesome).

Servings: 2
Serving Size: About 1 cup
Points Plus: 1pp
Prep Time: 5 Minutes
Cook Time: n/a
Level of Difficulty: Easy

Ingredients
2 cups fresh or frozen blueberries
2 cups unsweetened vanilla almond milk
6 fresh basil leaves
4 ice cubes

Directions
It doesn't get any easier than this.  Put all ingredients in a blender or magic bullet and blend. I use a bullet, and often shake it as it is blending to get the ice incorporated faster. Add a fun straw and enjoy!

Tip
To really shake things up add a rip or frozen banana for no additional pp!

XOXO - Katie

6.26.2014

Strawberry Basil Sparkling Lemonade

Who doesn't love a light and refreshing summer cocktail? This is a delicious blend of strawberry, basil and lemon flavors. It's hard to resist and only have one!

Servings: 2
Serving Size: 8 oz. cocktail
Points Plus: 4pp
Level of Difficulty: Easy
Prep Time: 10 minutes


Ingredients:
1 cup strawberries, halved
1/4 cup fresh basil leaves
8 oz. Simply Lemonade
4 oz. champagne
2 whole strawberries (for garnish)

Directions:
In a food processor, pulse the halved strawberries and basil leaves until finely chopped and combined.  Place ice in two low-ball glasses. Pour 4 oz. lemonade into each glass and top with 2 oz. champagne. Finally, top the drink with  1 1/2 Tbsp. strawberry and basil mixture. Stir to mix well. Garnish the edge of each glass with a sliced strawberry.

Tip:
If you are hosting a party you could easily bulk out this recipe to make a whole pitcher of strawberry basil sparkling lemonade to serve for your guests! Prep the garnished strawberries ahead of time and chill your glasses on a tray in the fridge or freezer to save time.

XOXO Megan

6.25.2014

Caprese English Muffin Pizzas

Caprese is the first thing I think of when I think of fresh basil!  Here's a new twist on English muffin pizza... caprese salad style.  These are a delicious, easy weeknight dinner that comes together in a flash!

Servings: 2
Serving Size 2 open-faced English muffin halves
Points Plus: 7pp
Level of Difficulty: Easy
Prep Time: 10 minutes
Cook Time: 5 minutes

Ingredients:
2 English muffins
4 tsp. olive oil
Salt & pepper to taste
2 oz. fresh mozzarella
2 Roma tomatoes, sliced
Fresh basil

Directions:
Toast the English muffins and lightly brush each half with 1 tsp. olive oil, salt & pepper.  Wash and slice the tomato.  Add tomato slices, fresh basil leaves and top with 1/2 oz. of fresh mozzarella on each English muffin half.  Broil in the oven for about 5 minutes or until the cheese just starts to melt.  Serve immediately!

Tip:
You could also drizzle some balsamic vinegar on these caprese English muffin pizzas.  I'm not a huge fan, so I didn't add any to my version above!

XOXO Megan

6.24.2014

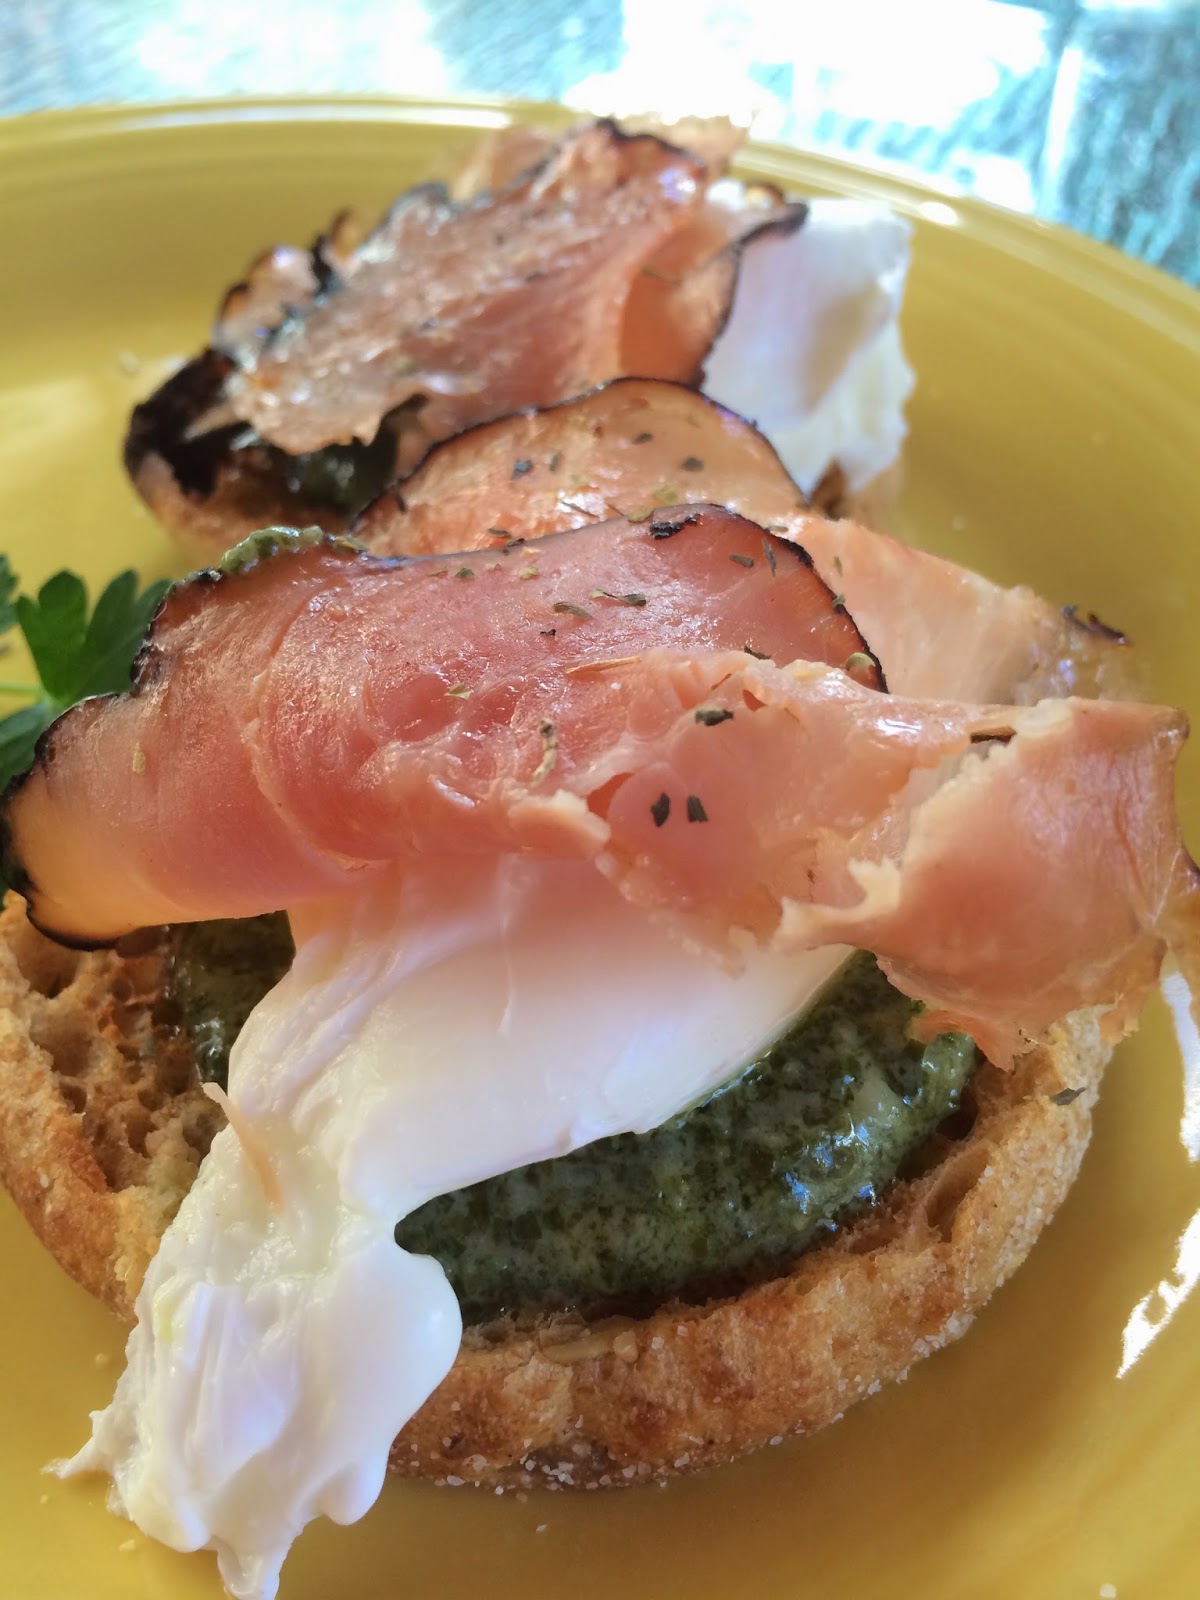
Pesto Eggs Benedict

Pesto eggs benedict, a simple twist on the original hollandaise classic. Remember that light and flavorful pesto? Well it goes great with a poached egg, English muffin and very thinly sliced ham.  this dish is sure to impress guests, or could be a simple breakfast-for-dinner option on a busy evening!

Servings: 2
Serving Size: Half of recipe
Points Plus: 9pp
Prep Time: 5 minutes
Cook Time: 20 minutes
Level of Difficulty: Medium

Ingredients
4 eggs, raw
2 English muffins, toasted
4 T foodlove's pesto
2 oz very thinly sliced ham, cut into  slices
Fresh parsley

Directions
The instructions to this recipe begin with 'how to perfectly poach an egg'.  It really is simple, all you need is a bit of patience, as it is best to poach eggs one at a time. Get out a small sauce pan and fill it with about two inches of water. bring the pot to a boil and add about a tablespoon of vinegar. Crack your egg into a small dish to avoid any shells getting in the way.  Take a large spoon, and swirl the water into a circle.  Get it moving fast - sort of like a little tornado! As the water is spinning drop the egg into the swirl, not the center.  This will help the egg stay together, it sort of catches itself by the quick movement and creates a nice shape, haha. The water will slow down, which is fine, just don't touch the egg after it has been dropped into the water.  Allow it to boil for 2-3 minutes and then remove it with a slotted spoon. If there are any 'egg parts' left in the water remove those as well. Set your egg on a paper towel and repeat the process!

While your eggs are poaching away heat up your ham either on a skillet or in the micro.

To assemble. Top each English Muffin half with 1 T of pest, then 1 poached egg followed by one thin slice of ham. Add a bit of fresh parsley to garnish, the parsley adds amazing flavor to this dish so don't leave it out!

Tip
You now how the old saying goes...practice makes perfect!  That rule applies to poaching an egg.  The vinegar is key to the process, it really helps keep the egg in one nice piece.

XOXO - Katie

Pesto!

It's basil week on foodlove! Summer herbs are growing abundantly at my house, and I am looking for any and every possible way to use them.  This pesto recipe is perfect because 1) It uses a lot of basil 2) It freezes well. It is also SUPER points friendly, at 1pp per T, you could really go to town. Also I licked the below bowl clean after finishing, haha. So pluck off a ton of basil leafs and get to work on this versatile sauce. Keep your eye out for more basil recipes this week!

Servings: 12
Serving Size: 1T
Points Plus: 1pp
Prep Time: 5 minutes
Cook Time: n/a
Level of Difficulty: Easy

Ingredients
2 cups fresh basil
1/2 cups high quality chicken stock or bullion
1/4 cups shredded Parmesan Cheese
1 T olive oil
2 garlic cloves
1 t kosher salt

Directions
Place all ingredients in a blender and, well, blend them until they are the consistency of a thick sauce! Add to pasta, veggies, toast, whatever!  The pesto was particularly tasty on fresh tiny tomatoes!

6.19.2014

Corn Puddin

It's Friday everyone! (as if you needed a reminder) What better way to celebrate a Friday than with a 'junk-food-gone-healthy' edition of a tasty side dish for your summer cookouts! Corn bread is a typical side dish to ribs, right?  I love corn bread, but wanted to make something a little more vegetable-y. I have seen talk online of something called 'corn pudding', and since I love regular pudding I thought this would be a fun experiment. I used frozen corn for this recipe, and think it would be even more tasty with fresh summer corn right off the cobb! This recipe would not only work as a side at a summer cookout, but could be just as good as a side on your Thanksgiving table (I know, we don't want to think about winter quite yet)!

Servings: 6
Serving Size: About 1/2 cup
Points Plus: 3 pp
Prep Time: 10 minutes
Cook Time: 40 minutes
Level of Difficulty: Easy

Ingredients
2 cups corn, frozen or fresh!
1 cup milk, fat free
1 1/2 T flour
2 raw scallions, chopped
2 t sugar
1/4 t table salt  
1/4 t dried thyme  
1/4 t black pepper, ground thyme  
1 large egg(s)  
1 large egg white(s)  
1/2 cup(s) low fat shredded cheddar cheese  
1/4 cup canned diced green chilies
A dash of cayanne

Directions
Preheat your oven to 350 degrees. Spritz a square glass baking dish with cooking spray and set aside.

Put flower in a saucepan and gradually whisk in your milk. Add the corn, scallions, sugar, salt,

Place the flour in a medium saucepan. Gradually whisk in the milk. Add the corn, scallions, sugar, salt, thyme, and pepper. Bring corn mixture to a simmer over medium heat, whisking frequently; cook until slightly thickened, 2 minutes.

Beat the egg and egg white in a small bowl. Gradually beat in some of the hot milk mixture, whisking constantly. Whisk the egg mixture back into the saucepan. Reserve 2 tablespoons of the cheese; stir the remaining cheese into the corn mixture. Spoon into the prepared baking dish and sprinkle the reserved cheese on top.

Bake until the pudding is just set in the center, about 35 minutes. Sprinkle with a bit of fresh thyme!

Tip
Using fresh summer corn instead of canned corn would be an amazing substitution!

XOXO - Katie

Recipe slightly adapted from Weight Watchers.

Penne All'Arrabbiata

...or really, a fancy way of saying 'spicy red sauce'.  This sauce was made using practically all fresh ingredients. The herbs were from our garden and the tomatoes and garlic from the farmers market.   My husband kept telling me this meal seemed boring because there were so few ingredients...until he tasted it!

Servings: 2
Serving Size: 1 cup pasta + 1/2 cup sauce
Points Plus: 7pp
Prep Time: 5 minutes
Cook Time: 10 Minutes
Level of Difficulty: Easy

Ingredients
2 cups cooked whole wheat penne
1 little bunch of fresh chopped oregano, leaves chopped
2 garlic cloves, thinly chopped
1 t good extra virgin olive oil
4 ripe chopped tomatoes
Kosher salt, to taste
A dash of chili pepper
1 bunch of fresh parsley chopped
2 t fresh parmesan cheese

Instructions
To prepare the sauce, combine extra virgin oil, chopped oregano, and minced garlic in a skillet. Sautee over low heat for about a minute.  Add tomatoes and chili pepper and cook for 10 minutes. Turn off the stove and add fresh chopped parsley. Stir again until the ingredients are well mixed. Add salt to taste.
Toss the sauce with your cooked pasta and stir until well coated. Top with fresh parmesan and parsley and serve!

Tip
You will be surprised how much the tomatoes cook down.  Feel free to add more to bulk up this recipe a bit.

XOXO - Katie

6.18.2014

Stuffed Mozzarella Meatballs

We had some good friends over for dinner last weekend and I served these delicious little meatballs with homemad red sauce over pasta + a chopped salad.  These meatballs are not only delicious, but they are also quite easy!  We prepped these ahead of time, so they were all ready to just pop in the oven once our friends came over.  It's key to find ways to not spend all the time in the kitchen and little to no time with your guests!

Servings: 8 (total recipe will make 24 meatballs)
Size: 3 meatballs
Points Plus: 3pp
Level of Difficulty: Easy
Prep Time: 15 minutes
Cook Time: 20 minutes 

Ingredients:
1 lb. ground beef, extra lean
1/3 cup grated Parmesan cheese
1/3 cup bread crumbs
1 egg
2 Tbsp. ketchup
1 tsp. minced garlic
1 tsp. kosher salt
1/2 tsp. fresh ground pepper
1/4 tsp. crushed red pepper flakes
1/2 cup fresh parsley, chopped
2 oz. fresh mozzarella

Directions:
Preheat the oven to 400 degrees. In a large bowl, mix together the ground beef, Parmesan cheese, bread crumbs, egg, ketchup, garlic, salt, pepper, red pepper flakes and fresh parsley (basically everything besides the fresh mozzarella).  Make sure everything is well combined.  Cut the fresh mozzrella into small pieces for the meatball stuffing.  Form the meatballs and make a little valley or hole in each one to add a piece of fresh mozzarella.  Reshape the meatball to make sure mozzarella is completely covered by meatball mixture. You should be able to make 24 meatballs in total. Bake in the oven for15-20 minutes or until cooked all the way through.  Serve with your favorite pasta and red sauce!

Tip:
Fresh herbs make SUCH a difference!  I have a little herb garden growing in small planters on my deck and let me tell you... they are so good and really amp up the flavor in any dish!  I just have oregano, rosemary and parsley growing out there, but I have already decided that next year I need to expand my herb garden. 

XOXO Megan

6.17.2014

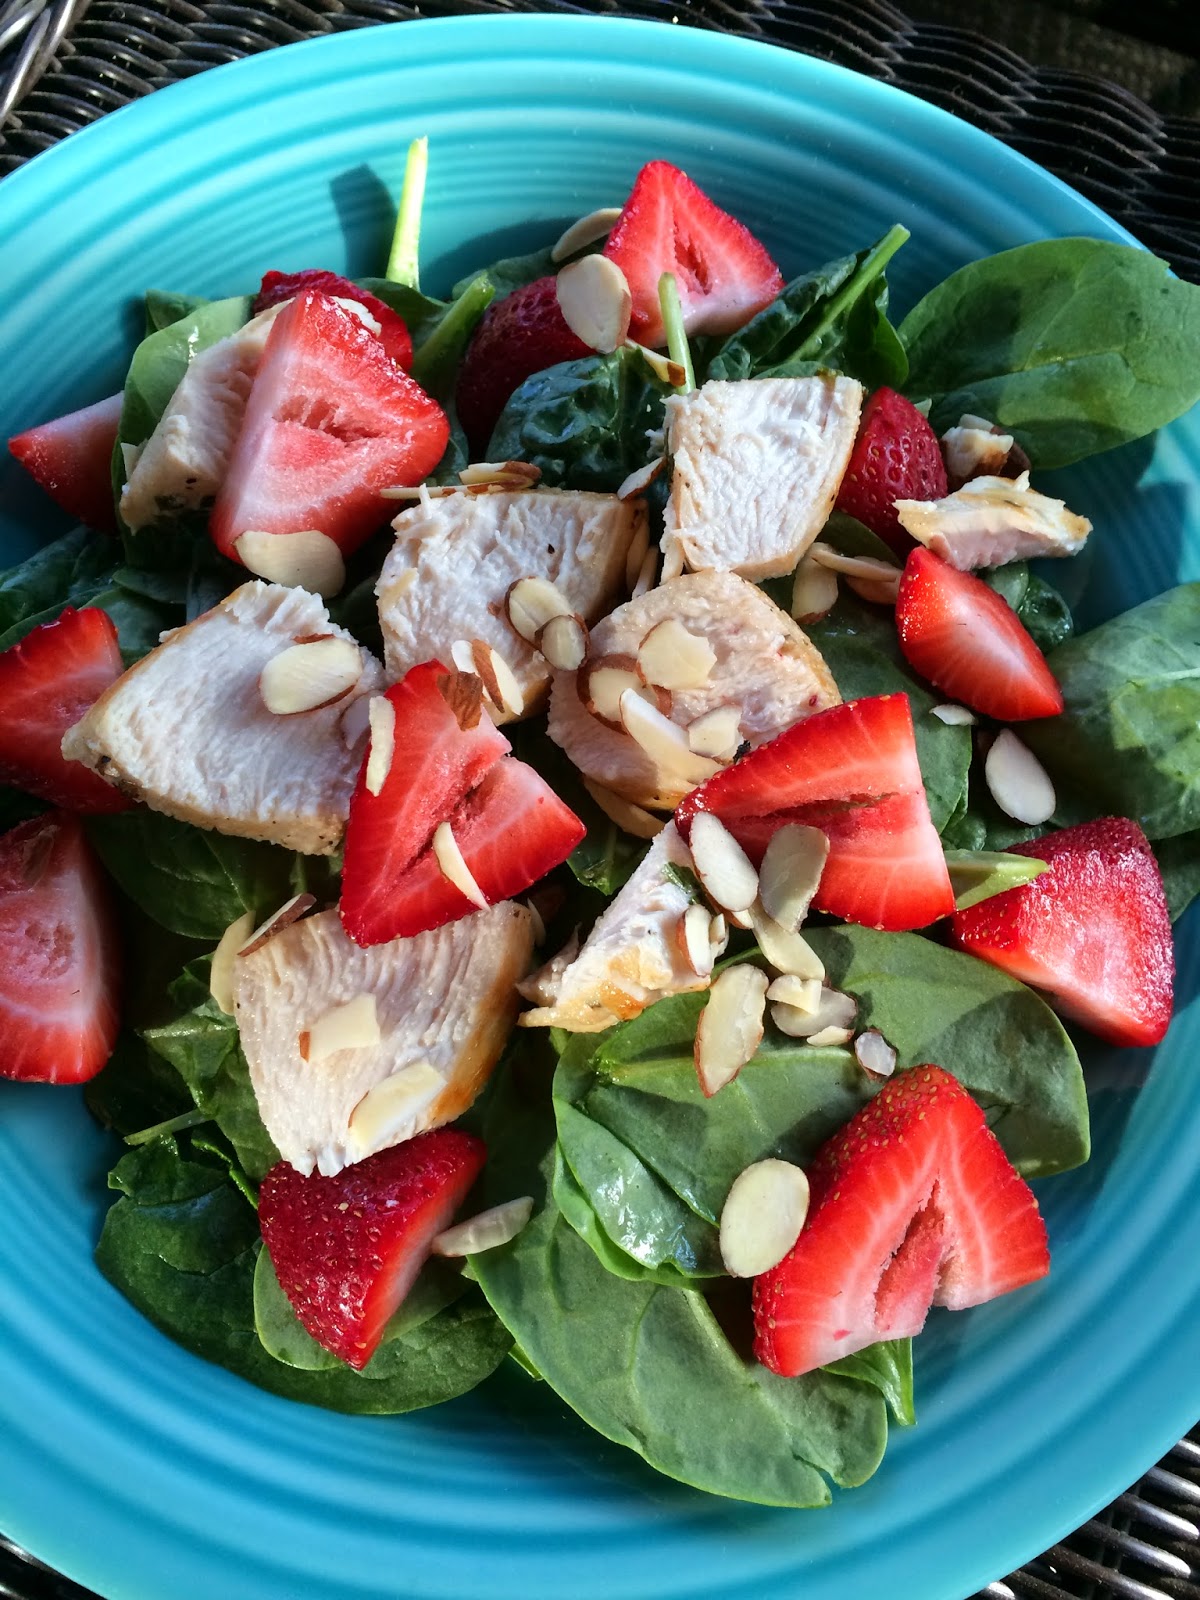
Strawberry Almond Salad with Chicken

A spinach, strawberry salad is a classic summertime salad!  This salad has a delightful blend of flavors.  I added in some almonds and a simply seasoned chicken breast to add some extra protein to this salad.  This is a quick and easy weeknight dinner that is light and refreshing!

Servings: 4
Serving Size: 1 entree salad
Points Plus: 5pp (does not include dressing)
Level of Difficulty: Easy
Prep Time: 10 minutes 
Cook Time: 15 minutes

Ingredients:
Baby spinach
2 chicken breasts, skinless and boneless
Kosher salt
Fresh ground pepper
2 cups strawberries
1/2 cup sliced almonds

Directions:
Wash and dry the spinach and plate out into 4 servings.  Slice each chicken breast in half (this will help to reduce the cook time) and cook in a saute pan until cooked through.  Generously season the chicken breasts with salt and pepper. Wash and slice the strawberries.  Top each salad with 1/2 chicken breast, sliced lengthwise, 1/4 cup of sliced strawberries and 1/8 cup of sliced almonds.  Serve with your favorite dressing!

Tip:
I didn't think of this until afterwards, but you could toast the almonds in a small pan on the stove to really bring out the almond flavor and add a little extra something to this salad.  Non- toasted almonds were delicious though too!
XOXO Megan

6.16.2014

Thai-Style Halibut with Coconut-Curry Broth

There are so many tasty things you can do with a high quality cut of fish. I don't have a lot of experience cooking fish, or meat for that matter, so decided to try a different technique with this recipe.  I purchased some really lovely looking Halibut and decided to pair it with a coconut-curry broth.  Because of this I decided to try poaching the fish in the broth, to really help seep the tasty Thai flavor into the fish. It came together as an easy Sunday evening dinner, that is pretty too!

Servings: 2
Serving Size: 1
Points Plus: 6pp
Prep Time: 5 Minutes
Cook Time: About 7 Minutes
Level of Difficulty:

Ingredients
2 6-oz cuts of Halibut, skin removed
1 t olive oil
2 shallots, chopped
1 cup chicken broth or stock
1/2 cup light coconut milk
1/4 cup cilantro leaves, chopped
1 scallion, sliced, green part only
1 T fresh lime juice
Fresh ground pepper + Kosher salt

Directions
In a large Dutch oven, heat olive oil.  Add shallots and cook until they are soft, about 3 minutes. Add in the curry paste and stir, cooking about 30 seconds more. Add the chicken broth, coconut milk and a pinch of salt, allowing the mixture to simmer about 5 more minutes, until it has reduced by half.

Season Halibut with a pinch of salt and add it to the coconut broth mixture.  Use a spoon to coat the fish with the sauce. Cover your Dutch oven and cook the fish for about 3 minutes on each side.  You will know the fish is done cooking with it flakes easily.

Remove the fish from your pot and place it in a shallow bowl. Top with cilantro, scallions, black pepper and lime juice.  Ladle the sauce over the fish and enjoy!

Tip
As the recipe suggests, I also served this dish with a side of steamed spinach and brown rice!

XOXO - Katie

Recipe adapted from Food Network.

6.13.2014

Macerated Berry Float

Macerated fresh berries - my new favorite thing! I was inspired by a recent edition of Martha Stewart Magazine to create a twist on a summer favorite - the ice cream float! I whipped up some low sugar macerated fresh berries, added some ice cream and topped the drink off with un-flavored seltzer water. It turned out to be the perfect refreshing early summer drink for a relaxing evening of porch sitting!

Servings: 2
Serving Size: 1 cup berries with syrup + 1/2 cup ice cream
Points Plus: 3pp*
Prep Time: Berries must sit overnight
Cook Time: n/a
Level of Difficulty: Easy

Ingredients
2 cups fresh berries, I used raspberries and blackberries
1 T sugar
1 cup slow churn vanilla ice cream
About two cups of cold seltzer water, cold
Large straws

Directions
Start by making your macerated fresh berries.  Make sure your berries are rip, this will help to bring out the natural sweetness of them.  Place them in a bowl and sprinkle 1 T of sugar over them.  Give them a stir, cover and let them sit in the fridge for several hours, for best results overnight.  This process breaks down the berries and turns them into a vibrant juicy sauce.

To build your float
Get out two pretty glasses and add half the berry mixture to the bottom of  both.  Be sure to add the fruit and the liquid. Next add about 1/2 cup of slow churn vanilla ice cream.  Finally top of your drink with enough seltzer water to fill the glass.  Add a large straw and give your drink a stir. Serve immediately, as the seltzer looses its fizz pretty quickly!

Tip
Get creative with your combos!  You could use any type of berries or ice cream you want, just remember to adjust the pp value.  Also, I LOVE these giant straws from Ikea, I use one almost every day!

*Click here to see why I could all fruit as 0pp in recipe builder.

XOXO - Katie

6.12.2014

Lemon & Oregano Roasted Whole Chicken

What do you do when the oregano in your herb garden is growing completely out of control? (in a good way) You Google, 'what to do with an over-abundance of oregano', you find several ideas for a simple oven roasted oregano whole chicken, and you get to work! Did you know roasting a chicken is super easy?  Give it a whirl!

Servings: Dependent on size of whole chicken
Serving Size: 3 oz
Points Plus: The number of pp will depend on what part of the chicken you eat.  Generally, chicken is about 1pp per oz.  Please contact me with questions.
Prep Time: 10 minutes
Cook Time: 1 hour
Level of Difficulty: Easy


Ingredients
1 whole organic chicken, about 3-4 lbs, cleaned and ready to roast
1 cup fresh oregano, chopped up
Juice and zest of two medium sized lemons
1/4 cup olive oil
Salt & pepper to taste

Directions
Preheat your oven to 400 degrees. Put your chicken right into a roasting pan or Dutch oven. Mix together the oregano, lemon juice, zest, olive oil, salt and pepper. Working in batches, rub that oregano mixture all over your chicken, including in its cavity. Lay the chicken on one side, and bake it for about 20 minutes. Flip the chicken to it's other side and bake 20 more minutes. Finally flip the chicken onto its back and bake for about 20 more minutes. You will know chicken is done when juices run clear. Remove the chicken from your oven and cover it with a little tent of tin foil.  Let it rest for about 10 minutes until cutting and serving!

Tip
Curious how to go about breaking down a whole chicken? Check out this video!

XOXO - Katie

6.11.2014

Cilantro Lime Quinoa

I'm a little on the fence about how I feel about quinoa.  I know it's really good for you and it's hearty and satisfying to keep you full longer, but I'm just not sure I love it.  That said, I am on a quest to try some more quinoa recipe to see if my taste develops.  This recipe has a great blend of flavors - lime, cilantro and jalapeno.  Check it out and see what you think!
Servings: 6
Serving Size: 1/6 of recipe
Level of Difficulty: Easy
Points Plus: 5pp
Prep Time: 15 minutes
Cook Time: 20-25 minutes
 
Ingredients:
1 Tbsp. olive oil
2 tsp. minced garlic
1 jalapeno, diced
1 medium onion, diced
1 4 oz. can green chiles
1 cup quinoa
2 cup vegetable broth
1/2 cup green onions, chopped
1 15 oz. can chickpeas
2/3 cup cilantro, chopped
Zest from 1 lime
2 Tbsp. lime juice
Salt & pepper to taste

Directions:
In a large skillet, heat the olive oil and saute the garlic, onion and jalapeno for 1-2 minutes.  Add in the quinoa, broth, green chiles, and salt & pepper.  Stir until everything is well combined.  Turn the burner to high heat and bring to a boil.  Once boiling, reduce the heat to simmer and cover.  Simmer for 20-25 minutes or until the qunioa is fully cooked.  Transfer cooked quinoa to a large bowl and stir in the green onions, chickpeas and cilantro.  Zest and juice the lime and add to the bowl.  Finish with some additional salt and pepper and serve in bowls.
Tip:
Warning - this recipe has a lot of lime flavor between the zest and lime juice.  If you aren't a huge fan, I would recommending cutting back and only zesting 1/2 the lime and not using all the juice.  I for one LOVE lime flavor and added the full amount!

XOXO Megan

Adapted from Laa Loosh

6.10.2014

Mini Yogurt Pies

As the days get warmer I am craving a nice cold dessert (I always crave desserts of any kind by the way). This summer dessert is super simple, impressive and the perfect after dinner treat for a hot day.

Servings: 6
Serving Size: 1 mini pie
Points Plus: 4pp
Prep Time: 5 minutes
Freeze Time: Overnight
Level of Difficulty: Easy

Ingredients
12 Keebler mini graham cracker crusts
8oz fat free cool whip
2 small containers of fat free yogurt (I used Yoplait Light Raspberry)
Fruit to garnish

Directions
Open your pie tins and set on counter. In a large bowl, mix cool whip and yogurt.  Whisk until combined. Place 1/4 cup yogurt filling into each pie tin. Top each with a berry or piece of fruit. Place in your freezer overnight until set.

Remove from freezer bout 15 minutes before serving.

Tip
Instead of making these cute mini pies you could pour the yogurt mixture into a normal size graham cracker pie crust.  Cut into 8 slices for 5pp each.

XOXO - Katie

6.09.2014

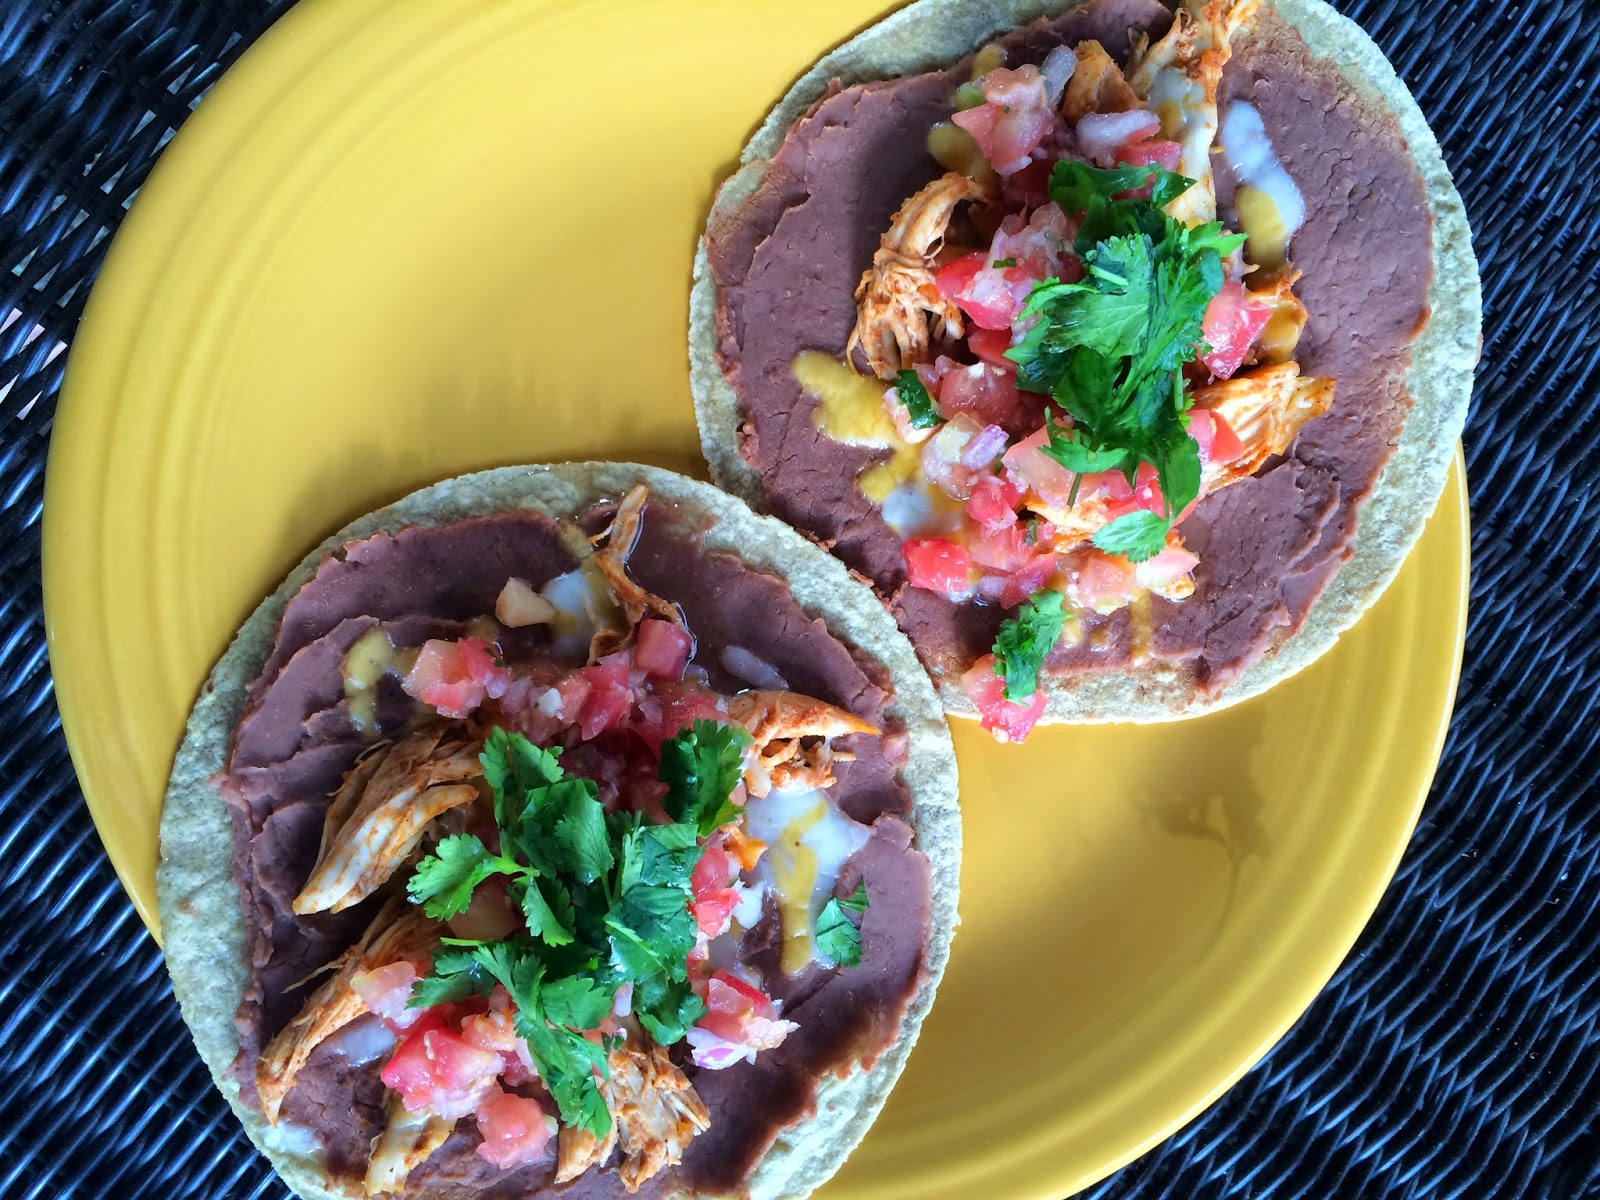
Chicken Taco Tostadas

Tostadas make for an easy weeknight dinner!  These Roasted Vegetable & Refried Bean Tostadas (from our blog archives!) are a delicious veggie option, but if you are in the mood for chicken tostadas, check out this recipe.  I feel like 2 tostadas can be pretty filling, you could cut it to 1.5 tostadas for 6.5pp instead if want! 

Servings: 4
Serving Size: 2 tostadas
Points Plus: 9pp
Level of Difficulty: Easy
Prep Time: 10 minutes
Cook Time: 10 minutes

Ingredients:
12 oz. rotisserie chicken
Taco seasoning + water
8 corn tortillas
1 15 oz. can refried beans
8 oz. shredded Mexican cheese, reduced-fat
Fresh pico de gallo
Fresh cilantro, chopped

Directions:
In a small saucepan, mix together taco seasoning and water over a low heat.  Add the rotisserie chicken and stir until the chicken is evenly coated with the seasoning.  Lightly grease 2 large baking sheets and place 4 tortillas per baking sheet.  Spread a layer of refried beans on each tortilla, extending to almost the edges.  Top each tortilla with about 1.5 oz. of taco chicken and 1 oz. of shredded cheese.  Bake the tostadas in a 300 degree oven for 5-10 minutes or until the cheese is melted and they are starting to brown.  To serve, add fresh pico de gallo and cilantro to each tostada.

Tip:
Homemade taco seasoning is SO much tastier than the packaged version!  I just picked up a jar of Penzey's spices which is a delicious blend of cumin, oregano, onion, allspice, paprika and much more.  Not only does it have WAY more flavor, it's also less expensive and you can buy it in bulk.

XOXO Megan

6.06.2014

Chicken, Bacon, Tomato Salad

Using up leftovers is a good way to get more out of your weekly grocery trip!  (and save $$ so you aren't always having to buy new ingredients for each meal!).  Remember last week's Un-fried Fried Chicken that was perfect for a picnic?  Well here's a recipe for an easy salad for one that helps you use up your leftover chicken!

Servings: 1
Serving Size: 1 entree salad
Points Plus: 4pp
Level of Difficulty: Easy
Prep Time: 10 minutes
Cook Time: n/a

Ingredients:
Mixed greens
1 Un-fried Fried Chicken tender, sliced
1 Roma tomato, diced
1 slice bacon

Directions:
Wash and plate out mixed greens for one entree salad.  Wash and dice the tomato.  Microwave or cook on the stove 1 slice of bacon.  Once the bacon is cooked (and cooled!), chop into small pieces.  Slice 1 leftover Un-fried Fried Chicken tender into slices and place on top of the greens.  Sprinkle the bacon and tomato on top of the salad.  Top with your favorite salad dressing (points plus for dressing not included above) - I chose to drizzle with a little bit of olive oil and balsamic vinegar.

XOXO Megan


6.05.2014

Black Bean Burger Salad

Remember those simple and tasty black bean burgers we posted last week?  Well, this recipe, is a great example of totally revamping leftovers!  I topped a simple Mexican inspired salad with a few of those black bean patties and created the tasty dish below. I LOVE the dressing too.  Keep the leftovers in the fridge of up to two weeks.

Servings: 2
Serving Size: 1/2 of Salad recipe, 1/4 cup dressing
Points Plus: 8pp
Prep Time: 10 minutes (using leftover black bean burgers or your fav. frozen brand*)
Cook Time: 1 minute
Level of Difficulty: Easy

Ingredients
Salad
6 black bean mini burgers, recipe here
Mixed greens
1/2 cucumber, sliced
1/4 cup red onion, sliced
1 cup cherry tomato's, sliced
1 cup assorted peppers, sliced
2 oz goat cheese
1/4 cup craisins
Cilantro

Dressing
1/2 cup salsa
1 t taco seasoning
1/2 cup fat free Greek yogurt
2 T cup light ranch salad dressing

Tip
When microwaving the black bean burgers to reheat them, wrap them in a damp paper towel. This will prevent them from drying out.

*If you are substituting the black bean burgers from foodlove with a frozen brand, adjust the points plus accordingly.

XOXO - Katie

6.04.2014

Open-Faced Pimiento Cheese BLTs

We are on the cusp of tomato season people, and who doesn't love a BLT with the freshest of tomato's!  This recipe is a BLT with a twist. Below the B, the L and the T there is a creamy cheese player that is mixed with pimientos. I have never cooked with these babies before, but their slightly sweet slightly salter flavor adds a new level to the BLT. Eat these cold or toss them on the stove for a few minutes to get the cheese warmed up - either way I am sure you will enjoy!

Servings: 2
Serving Size: 1 open-faced sandwich
Points Plus: 6pp
Prep Time: 10 minutes
Cook Time: 3 minutes (optional)
Level of Difficulty: Easy

Ingredients
1 T bottled diced pimientos, drained
1 T onion, diced small (you can use any kind of onion)
1 T light mayo
1/2 t apple cider vinegar
2 T grated parmesan cheese
2 slices sharp cheddar cheese
4 tomato's, thinly sliced
2 slices of center-cut bacon, cooked crispy and cut in half
1 cup greens, I used mixed
2 slices whole wheat bread
Fresh cracked black pepper + Kosher Salt

Directions
Combine the first five ingredients and cover with a light layer of black pepper. Mix until everything is well incorporated. Toss your bread into the toaster until it is your desired crispiness.  If you are planning to heat these on the stove after you add the toppings (like I did), toast them for a little shorter amount of time. When your bread is toasted cover them with 1/2 of cheese mixture, then 2 tomato slices. Sprinkle on a bit of Kosher salt.  Next half of your mixed greens and finally finish with you bacon slice.  Cut in half and enjoy!

Tip
We rarely eat bacon at home, so for this recipe I simply asked the butcher for two pieces! Only .80 cents and no leftovers, but a tasty treat!

XOXO - Katie

Adapted from My Recipes.

6.03.2014

BBQ Chicken Pizza

Homemade pizza is easily our favorite recipe when we don't feel like making something that takes a lot of time.  This past weekend we thought about making our usual pizza - turkey pepperoni and some veggies, but I said no let's think of something new.  The first idea that popped in both our heads was to try out a BBQ chicken pizza.  Let me tell you... this was SO good it might become our new staple!  I did some research to see what others put on their BBQ chicken pizzas and I came up with this recipe as a combo of a bunch of different ideas.

Servings: 8
Serving Size: 1 slice
Points Plus: 5pp
Level of Difficulty: Easy
Prep Time: 10 minutes
Cook Time: 15-20 minutes

Ingredients:
1 can Pillsbury refigerated pizza dough, classic style
3/4 cup BBQ sauce, divided
6 oz. rotisserie chicken
1 1/2 cup shredded mozzarella, reduced-fat
1/4 cup red onion, diced
Fresh cilantro, chopped

Directions:
Open the can of pizza dough and gently shape into a pizza shape on a lightly greased pizza pan. Pre-bake the crust for about 6 minutes in a 400 degree oven before adding toppings.  Once the crust is pre-baked, evenly spread 1/2 cup of of BBQ sauce almost to the edges of the dough.  In a small bowl, combine the rotisserie chicken with 1/4 cup of BBQ sauce and stir until the chicken is evenly coated.  Top the pizza with mozzarella cheese, BBQ chicken and sprinkle the diced red onion and chopped cilantro on top.  Bake for an additional 5-10 minutes, or until the crust is a golden brown.
Tip:
Rotisserie chicken is a great easy way to have fresh chicken on hand for a variety of recipes!  Pizza, tacos, add to a pasta dish etc. 
XOXO Megan

6.02.2014

Asian Grilled Tofu + Bento Box Lunch

Hello!  I hope ya'all had a great weekend.  I did a lot of baking and cooking this weekend, and found some amazing new recipes.  I used to work downtown Minneapolis, and when I did one of my absolute fav. lunch spots served a Tofu Veggie Bento Box.  It is one of the things I miss most about working down there! I have cooked a bit with tofu, and it really never works.  But I decided to try ONE more time to create a copy of this dish and it worked great! I enjoyed this very healthy and filling bento box for lunch yesterday AND will be enjoying it for lunch today. 

Servings: 2
Serving Size: 6 oz tofu, 1/2 cup brown rice, steamed broccoli
Point Plus: 9pp
Prep Time: 1 hour (including marinating time)
Cook Time: 1 hour (including cooking brown rice)
Level of Difficulty: Medium


Ingredients
12 oz extra firm tofu
1/4 cup low sodium soy sauce
1 t sesame oil
1 1/2 t brown sugar
1 small garlic clove, minced
1/4 t red pepper flakes
1 t olive oil
1 cup brown rice
1 head broccoli
Salt + pepper to taste
Sriracha

Directions
To prepare tofu
Using a serrated knife, cut tofu into small pieces.  I like the pieces about 1" by 1 1/2".  The key to cooking tofu that doesn't fall apart is getting as much water out of it as possible. To squeeze the water out, I cleared off my stove and put down a triple layer of paper towels. I set the tofu on a single later over the towels and covered them with another triple layer of paper towels.  I then set my very heavy Le Creuset Dutch oven over the tofu to press it down. I let it sit for about five minutes, and then repeated the process three more times.  Really, try to do this pressing step at least four times for best tofu grilling results!

Next make the marinade. Mix all remaining ingredients in a shallow flat bottomed dish and whisk around.  Add tofu and let it marinade for at least 30 minutes, flipping it every 5 minutes or so.  Again, the longer you marinate the tofu the better it will be!

To prepare. Heat a grill pan (or non-stick skillet) on your stove over medium heat and allow it to get hot. You will know it is not enough when you drop a tiny drop of water on it and it sizzles and evaporates right away.  Having a really hot pan will allow the tofu to sear off and get those lovely grill marks that you see above.  It also creates a slightly crunchy crust on the tofu. Working in batches and using a tongs, gently place each piece of tofu on to the grill pan, and let each side cook for about 2-3 minutes. After one side has cooked, give it a flip and cook the other side.  Tofu is done when each side is golden brown.  Remove the tofu from your grill pan and set it on a plate until you are ready to assemble this dish.

To prepare brown rice
Follow the package instructions on your brown rice to make 1 cup unprepared.  I love to use a rice cooker, so I added one cup of uncooked rice and 2 1/4 cups of chicken stock to my rice cooker and turned it on. Brown rice takes a while to cook in a rice cooker, about 45 minutes, so I would actually suggest making the brown rice before you start the tofu.

To prepare broccoli
Cut a large head of broccoli into small pieces. Set a medium sauce pan with about 1/4 cup of water on your stove and turn on.  Add broccoli and cover, allowing the broccoli to steam for about 3-4 minutes. Check broccoli after 4 minutes and if you can pierce it with a fork, it is done!

To assemble
Place 1/2 of the broccoli, 1/4 cup cooked brown rice and 6 oz of grilled tofu on a plate. I love to add Sriracha at this point, so feel free to add that or your fav. hot sauce! I packed a separate Tupperware container to bring for lunch!

Tip
You could easily double this recipe and make four lunches out of it! Do all your prep on Sunday for a week of stress-free eating.

UPDATE!!! Microwaved, reheated tofu is NOT good.  I suggest eating this recipe fresh or the leftovers cold :)

XOXO - Katie