5.29.2014

Un-fried Fried Chicken

Over Memorial Day weekend we planned a picnic in a park.  Breaded, fried chicken is a great picnic food, but not necessarily the healthiest.  This recipe helps to really lighten up fried chicken in what I'm called un-fried fried chicken! The corn flake crumbs really help to give the chicken a crispy, delicious breading but without the grease and fat of pan-fried chicken.  Substitue in other spices if you prefer other flavors or don't have some of the spices below on hand.

Servings: 8
Serving Size: 2 chicken tenders, about 4 oz.
Points Plus: 6pp
Level of Difficulty: Easy
Prep Time: 20 minutes
Cook Time: 35-45 minutes 

Ingredients:
2 lbs. skinless, boneless chicken breast tenders
1 1/2 cups buttermilk, low-fat
2 cups cornflake crumbs
1 1/2 tsp. thyme
1 1/2 tsp. paprika
1 1/2 tsp. oregano
1 tsp. Old Bay seasoning
1/2 tsp. salt
1/4 tsp. pepper
1/2 tsp. garlic powder

Directions:
Rinse the chicken tenders and pat dry with paper towels. You will use two seperate flat containers to bread the chickem, pour the buttermilk in one.  In a medium bowl, combine cornflake crumbs, thyme, paprika, oregano, Old Bay seasoning, salt, pepper and garlic powder until well combined.  Pour the spice/cornflake mixture into the other flat container. Bread the chicken tenders by dipping first in the buttermilk and then the cornflake crumbs, gently pressing to make sure the breading sticks.  Place the breaded chicken tenders in a 9x13 pan and bake in a 400 degree oven for 35-45 minutes. Check to make sure the chicken is cooked to an internal temperature of 165 with a meat thermometer before removing from the oven.  Serve warm or at room temperature. Enjoy!

Tip:
A meat thermometer is a really helpful kitchen tool.  I don't have one myself (we made this at my parent's house and luckily my mom does own one!), but I think I need to go out and buy one.  It's an easy way to make sure your meat is cooked all the way through without having to fully cut into whatever you are making.

XOXO Megan

Quinoa Black Bean Sliders

I have never made black bean burgers before, or sliders for that matter.  For some reason the idea of a black bean burger salad popped into my head earlier this week, so I decided to start with the burgers! (watch foodlove for that salad recipe coming soon!) These are tasty, flavorful and freeze well.  Also - they are the cutest things ever! Enjoy and watch for my black bean burger salad later this week!

Servings: 14 Sliders
Serving Size: 2 Sliders
Points Plus: 2pp*
Prep Time: 10 minutes
Cook Time: 20-25 minutes
Level of Difficulty: Easy

Ingredients
1 can of black beans, drained and rinsed
1/2 cup cooked quinoa
1/3 cup of bread crumbs
1/4 cup yellow bell pepper, minced
2 T onion, minced
1 scoop of garlic to taste, or 1 large clove, minced
1 1/2 t ground cumin
1/2 t salt
1 splash of Franks RedHot, or more to taste
1 egg
Pepper to taste

Directions
Preheat your oven to 400 degrees. Place your black beans in a mixing bowl and squish them with the back of a wooden spoon.  Squish them until they are mostly all squished, but not completely blended. Add quinoa, bread crumbs, pepper, onion, garlic, cumin, salt, pepper and Franks.  Stir until all ingredients are incorporated. Add the egg and mix it all together again until mixture is a gooey consistency.

Spray a baking sheet or do as I did, and place a silicone baking mat on a cookie sheet. Form the black bean mixture into 14 balls.  I used the Pampered Chef medium cookie scoop, which is about 2 T large. You could easily use a regular tablespoon to make the balls.  I used the scoop to make 14 balls, placing each on the cookie sheet after I scooped.  I then used my finger to press down the balls creating more of a patty shape that is about 2 inches in diameter.

Bake your black bean burgers for 20-25 minutes, until they are crisp and crunchy on the outside. Remove from oven and let cool for about 3 minutes. 

*This recipe includes points plus for the burgers only, but feel to make these into your favorite type of burgers!  I used a small juice glass to cut a piece of bread into four small circles.  I then added lettuce, stone ground mustard, ketchup, tomato, and a dab of Franks to create mini burger sliders.  My mean including 2 burgers, bread and all the fixings was just 4pp!  Also note - these sliders are pictured on a salad plate, and about 2 inches in diameter.  They are not half the size of a dinner plate!

Tip
If sliders isn't your thang feel free to make these into bigger burgers and adjust the points plus accordingly!

XOXO - Katie

5.28.2014

Ammie's Buttermilk Waffles

Sunday morning waffles were a staple in our house growing up.  My mom always made them for us before church.  This recipe actually comes from her mom.  Ammie (the affectionate name we used instead of Grandma) got this recipe with her Sunbeam Mixmaster stand mixer which was a wedding gift back in 1948.  This recipe is sooo good that we are still using it 66 years later!  I know she would be proud to know that is the case. Although you are indulging a bit with this breakfast, it is SO good that I think the points are worth it!  Balance out your day with a lighter lunch and dinner.  The full recipe makes a lot of waffles, you can easily cut the recipe in half to only serve four!

Servings: 8
Serving Size: 1 waffle
Points Plus: 8pp
Level of Difficulty: Easy
Prep Time: 15 minutes
Cook Time: 20 minutes

Ingredients:
2 1/2 cups flour
1 tsp. baking soda
2 1/2 tsp. baking poswer
1 1/2 tsp. vanilla
2 Tbsp. sugar
1 tsp. salt
4 eggs
2 cups buttermilk
8 Tbsp. light pancake syrup
8 tsp. mini chocolate chips

Directions:
In a large mixing bowl, combine the flour, baking soda, baking powder, sugar and salt. Beat the eggs in a smaller bowl with a hand mixer.  Add the buttermilk and vanilla to the egg mixtue. Add the wet ingredients to the dry ingredients and mix just until smooth - make sure you don't overmix the batter.  Make the waffles in a preheated waffle iron and serve immediately with light pancake syrup and a little bowl of mini chocolate chips!

Tip:
Buttermilk is really the key to this recipe.  It makes sure the waffles aren't dry and it gives a homemade flavor that is just so good!
XOXO Megan

5.27.2014

Eggs In A Pepper

Egg in a frame (or egg in a hole) is one of our all-time favorite breakfasts. I am always looking for a new twist on an old standby recipe, so when I saw the 'Egg in a Pepper' craze on Pinterest I knew I had to try.  Add this easy and fun way to prep eggs to your breakfast rotation!

Servings: 4
Serving Size: 1 Egg in a Pepper
Points Plus: 2pp
Prep Time: Less than 5 minutes
Cook Time: 5 minutes
Level of Difficulty: Easy

Ingredients
4 eggs
1 large green pepper (or colored pepper of your choice)
Cooking spray
Kosher salt + pepper to taste

Directions
Wash your pepper and cut it into four rings, about 1/2 inch thick. Spritz your non-stick skillet with cooking spray and pre-cook the peppers a bit, about 90 seconds on each side over medium heat. Carefully crack one egg into the center of each pepper. Cook the egg until it is to your desired doneness (is that a word).  I wanted to try to make these sunny-side-up, so cooked the eggs for about 4 minutes, just on one side, over medium heat.  If you like your eggs fried and more cooked you could flip them after about 2 minutes. Remove your eggs from the pan and plate, sparkling with kosher salt and pepper to taste.

Tip
Make sure that you don't cut your pepper rings too thin.  A few of my rings were, causing the egg to leak over the top. To get the prettiest of eggs I cut them about 1/2 thick.

XOXO - Katie

5.23.2014

Smoothies in the HIZOUSE!

Happy Friday everyone! I pride myself in LOVING a challenge in the kitchen.  I love making elaborate complicated desserts that take all day.  But for some reason, the food that always intimidated me the most, was a simple smoothie.  Maybe it is the fact that I'm lazy and don't like washing my blender or maybe it is the fact that we are finally now just getting into spring and there is fresh fruit. Whatever the reason I pulled out my magic bullet the other weekend, and decided to face my fear.  And you know?  Making a smoothie is super EASY and filling (and pretty too). Below is my first recipe attempt, and watch for more to come!
 
Servings: 1
Serving Size: 1 smoothie
Points Plus: 2pp*
Prep Time: 5 minutes
Cook Time: n/a
Level of difficulty: EASY!

Ingredients
1 banana
1/2 cup almond milk
1 handful of raspberries
1 handful of blueberries
1/2 cup low-fat vanilla Greek yogurt
A few ice cubes (optional)
 
Directions
Pull out your blender or magic bullet and add all ingredients. Turn that baby on and let it do it's work!  I have found that when using the magic bullet, if there isn't enough liquid, it won't work. Stop your device a few times to scrape the sides.  Blend until everything is incorporated.  Pour in a glass and enjoy with a straw!

Tip
As a member of Weight Watchers (lifetime member I might add) I have seen a lot of debate and questions about when to count points plus for fruit and when to put something, such as a smoothie into the recipe builder on e-tools.  For this recipe I only counted points plus for the non fruit items.  If you would like more information about this topic or would like me to send you articles from Weight Watchers talking about this topic please contact me through our comments section.

Happy Memorial Day everyone!

XOXO - Katie


5.22.2014

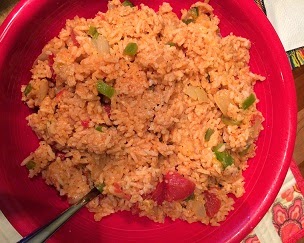
Spanish Rice

Have you ever made Spanish rice??  I hadn't either, but it's really quite easy!  I love to use a rice cooker since it makes cooking rice a breeze!  This recipe adds in some veggies and spicy flavors to make a delicious side dish for your next Mexican night.

Servings: 8
Serving Size: 1/8 of recipe
Points Plus: 3pp
Level of Difficulty: Easy
Prep Time: 10 minutes
Cook Time: 30 mintues

Ingredients:
1 1/2 cups long grain rice
2 cups chicken or vegetable stock
1 Tbsp. butter
1/2 cup onion, chopped
1/2 cup green pepper, chopped
1 clove garlic, minced
14.5 oz. can diced tomatoes with green chiles
1 tsp. chili powder
1 tsp. salt
1/2 cup shredded cheddar, reduced-fat

Directions:
Cook the rice and chicken broth in a rice cooker - this will take about 20 minutes.  While the rice is cooking, wash and chop the onion and green pepper.  Melt 1 Tbsp. butter in a large saucepan over medium heat.  Add the onion, green pepper and garlic - saute for 3-5 minutes.  Stir in the diced tomatoes, chili powder and salt.  Add in the cooked rice and shredded cheddar; stir until well combined.  Transfer to a serving bowl to serve immediately!
 
Tip:
Serve this Spanish rice with the Flank Steak Fajitas we posted earlier this week! They are a perfect complimentary side dish.
 
Recipe adapted from Food Network

XOXO Megan

5.21.2014

Chopped Salad w. Orange Citrus Dressing

Do you ever have a recipe planned out, and then you think you have everything to make it but actually you have almost nothing to make it so you just improvise? Well, I had every intention of making this tasty chopped salad last week, and for company no less!  But when it came time to make it, I was actually missing some of the ingredients.  So you know what?  I improvised!  And my guests said it turned out pretty darn good. And what goes better with a salad than a crusty piece of bread? So, I am also including a simple recipe for what I am deeming 'Rosemary Oven Bread' below.

Servings: 4
Serving Size: 1/4 of the salad recipe, 1 slice of bread and about 1 T dressing (for an oil based dressing this is plenty of flavor)
     Salad: 6pp
     Dressing: 1pp
     Bread: 4pp
Prep Time: 5 minutes
Cook Time: 5-7 minutes
Level of Difficulty: Easy

Ingredients:
Salad
2 oz of bacon, cooked crispy making it easily crumble. OR you can buy pre-cooked bacon, which in my opinion is delicious
16 oz mixed greens
1/4 cup almond slivers
1/2 cup dried cranberries 
2 ounces blue cheese, crumbled
Dressing 
1 1/2 T apple cider vinegar
1 T freshly squeezed orange juice
1 t Dijon mustard 
Kosher salt
1/2 teaspoon freshly ground black pepper
1 1/2 T olive oil
Rosemary Oven Bread
8 oz french bread, cut into 1.5 oz long flat pieces (see photo)
4 t olive oil
Rosemary to taste

Directions:
Preheat your oven to 400 degrees.  Pour 4 t of olive oil in a small bowl.  Using a silicone brush, slightly brush each piece of french bread evenly with olive oil. Sprinkle with dried rosemary to taste.  Place prepared bread in your warm oven for 5-7 minutes.  Watch closely as oven temperatures very.
Mix all salad ingredients in a large pretty bowl, layering, with lettuce on the bottom. Whisk together all dressing ingredients.  Slowly drizzle dressing over salad and toss gently with a tongs until salad is coated.

Tip:
If you are making this salad ahead of time, don't add the dressing until right before you serve it.  This will prevent any sogginess.  You could easily divide the serving size into 8 for smaller portions and half the pp!

XOXO - Katie

5.20.2014

Flank Steak Fajitas

Fajitas are an easy, healthy, delicious Mexican meal!  They are even EASIER in the crock pot.  I can't say I have cooked a lot of flank steak, but similar to chicken, the meat is so tender and well seasoned after cooking in the crock all day long.  I also love when the main dish for your meal is already done before dinner time.  This recipe comes from my Mom's recipe file - it's one of her favorite Mexican meals to make!

Servings: 8
Serving Size: 2 fajitas
Points Plus: 7pp
Level of Difficulty: Easy
Prep Time: 10 minutes
Cook Time: 4-5 hours in the crock pot
Ingredients:
1 1/2 lbs. beef flank steak
1 onion, sliced
1 red pepper, cut into strips
1 green pepper, cut into strips
1 jalapeño, diced
1 Tbsp. fresh cilantro
2 cloves garlic, minced
1 tsp. chili powder
1 tsp. cumin
1 tsp. coriander
1/4 tsp. salt
8 oz. can diced tomatoes
16 flour tortillas
Fresh cilantro, chopped

Directions:
Cut the flank steak into 6 pieces. In the crock pot, combine flank steak, onion, peppers, cilantro, garlic, chili powder, cumin, coriander and salt.  Stir in the diced tomatoes.  Cover the crock pot and cook on high for 4-5 hours.  Once the meat is cooked through, remove the meat and shred the flank steak.  Return the steak to the crock pot and stir until well combined.  Keep on warm until you are ready to serve dinner.  Assemble the fajitas by placing steak and onions/peppers in each tortilla and topping with fresh cilatnro.

Tip:
This hold and slice tool from Pampered Chef works great for holding piping hot meat while you shred it!  The prongs keep you from burning yourself and keep the meat in place so you can easily shred it and return it to the crock pot.  Check it out!
XOXO Megan

5.19.2014

Buffalo Cauliflower Bites

These spicy little buffalo bites have become a staple around our house these last few weeks. In fact, after trying them for the first time, we proceeded to make them FIVE times in ONE week! They are so easy, could be a whole meal or just a side (or snack). I serve them with a side of low-fat ranch for dippin'!  

Servings: 4
Serving Size: About 1 cup
Points Plus: 3pp
Prep Time: 10 minutes
Cook Time: 20 minutes
Level of Difficulty: Easy

Ingredients
1 large head of cauliflower, chopped into florets
1/2 cup liquid egg substitute
1/2 cup flour
1 T garlic powder
1 T onion powder
2/3 cup Franks Red Hot Sauce
1 T light butter, melted
Cooking spray
**Optional - 8 T light Ranch dressing - this adds an additional PP

Directions 
Preheat your oven to 450 degrees. Spray a large baking dish with cooking spray. Mix together your egg substitute, flour, garlic powder and onion powder. Put cauliflower in a large dish and slowly pour eggy-floury mixture over the cauliflower, gently tossing it so that all of the cauliflower is covered with the mixture. Using a tongs, remove each place of cauliflower from the bowl and place it onto the prepared cookie sheet in a single layer. toss it in your oven and bake for about 20 minutes, until the cauliflower is browned and crunchy.

Mix together Franks Red Hot Sauce and melted butter in a large dish. Add the cauliflower to the Franks and toss until all of your veggies are coated with sauce. Pour them back on the cookie sheet in a single layer, pouring extra hot sauce over them. Bake for another 5-10 minutes, until crispier. Serve hot and with light ranch for dipping.

Tip 
When dealing with the Franks, use a metal or glass bowl. I used (and ruined) a the plastic bowl that I was using because the Franks stained the heck out of it!

XOXO - Katie

5.16.2014

Glazed Donut Muffins

I had been wanting to try this recipe out for a long time and I finally did!  I made these on Easter for quick, light-ish breakfast before church and a bigger Easter meal with family around noon.  They were delicious!  I mean what an awesome combo?!?  Glazed donut meets muffin form!!!  They are definitely a bit indulgent, but in my opinion, completely worth the splurge!

Servings: 16 muffins
Serving Size: 1 muffin
Points Plus: 6pp
Level of Difficulty: Medium
Prep Time: 20 minutes
Bake Time: 15-17 minutes

Ingredients:
Muffins:
1/4 cup butter
1/4 cup vegetable oil
1/2 cup sugar
1/3 cup brown sugar
2 eggs
1 1/2 tsp. baking powder
1/4 tsp. baking soda
3/4 tsp. nutmeg
1 tsp. cinnamon
3/4 tsp. salt
1 tsp. vanilla
2 2/3 cups flour
1 cup skim milk

Glaze:
3 Tbsp. butter, melted
1 cup powdered sugar
3/4 tsp. vanilla
2 Tbsp. hot water

Directions:
Preheat the oven to 400°.  Line a regular muffin tin with liners.  In a large bowl, cream together the butter, oil and white and brown sugars.  Add the eggs, one at a time, and beat until smooth.  Add in the baking powder, baking soda, nutmeg, cinnamon, salt and vanilla, stirring until just well combined.  Alternately add the flour and milk seperately; add about 1/2 the flour, then 1/2 the milk and repat.  You want to make sure to not overmix this batter. 

Spoon the donut muffin batter into the muffin cups.  Bake for about 15-17 minutes or until the muffins are just turning golden brown.  Cool muffins on a wire rack.  It's important you allow the muffins to cool before you add the glaze to the tops.  Make the glaze in a small bowl by mixing together the butter, powdered sugar, vanilla and water.  Use a whisk to make sure the glaze is smooth and void of lumps.  Dip each muffin top into the glaze by turning the muffins upside down.  Allow the glaze to harden and then transfer back to the wire rack to cool/harden further.  You might need to dip the muffins a second time.  It kind of depends on your preference!

Tip:
A tip I use often when I make muffins is to split the batter into regular muffins and some mini muffins.  Mini muffins are obviously less pp value and you still get the taste!  Obviously mini muffins are a bit easier to overeat though, so make sure to practice portion control if you take this strategy.

XOXO Megan

Recipe adapted from Sweet Pea's Kitchen

5.15.2014

Chicken Piccata

There is something about pounded out, flat, tender, fried chicken that just makes is so much more appealing than regular (boring) baked chicken! Chicken Piccata is a recipe that normally is deep fried, but in this recipe it is simply pan fried, and it had to much flavor! The lemony caper sauce is just the right topping for this simple entrée. And what can I say?  It is super pretty!

Servings: 4
Serving Size: 1 chicken breast
Points Plus: 5pp
Prep Time: 10 minutes
Cook Time: 10 minutes
Level of Difficulty: Easy

Ingredients
2 skinless chicken breasts, butterflied making four cutlets
2 T egg beaters
1/2 cup seasoned whole wheat dry bread crumbs
Olive oil spray
Juice of 1 lemon, lemon halves reserved
1/4 cup dry white wine
1/2 cup reduced sodium chicken broth
1 T capers
Sliced lemon, for serving
Chopped fresh parsley leaves, for serving
Kosher salt + black pepper

Directions
Place each piece of chicken in a plastic zip lock bag and using a meat tenderizer, pound the chicken thin, to about 1/4 inch thick.  Sprinkle the chicken with kosher salt and pepper.

Pour your egg beaters and bread crumbs in two separate bowls. Dip each chicken breast first in the egg, then bread crumbs.

Heat a large non-stick pan over medium heat and spray with cooking spray. Cook the chicken for 2-3 minutes on each side, until cooked through. Set aside and cover with tin foil to keep warm.

To make the sauce, melt the butter in a small sauce pan. Add the lemon juice, wine, chicken broth and the reserved lemon halves, salt, and pepper. Boil over high heat until reduced in half, about 2 minutes. Toss the lemon halves, add the capers and serve one chicken cutlet on each plate. Spoon on the sauce and serve with a slice of lemon and a fresh parsley.

Tip
This is a great 'fried' chicken, even without the sauce! Try cooking your chicken with this method and using it to top a freshly tossed veggie salad!

Recipe adapted from Skinnytaste.


5.14.2014

Taco Dip

I love taco dip!  It's a great appetizer when you are having Mexican for dinner.  This recipe is for a lightened up version and it's SO good!   I like to add fresh cilantro to the top for an extra pop of flavor.  Check it out and see what you think of this skinny, light version of taco dip!

Servings: 24
Serving Size: 1/24 of the taco dip
Points Plus: 2pp
Level of Difficulty: Easy
Prep Time: 15 minutes
Cook Time: n/a

Ingredients:
8 oz. cream cheese, 1/3 less fat
8 oz. sour cream, reduced-fat
15 oz. can refried beans, reduced-fat
16 oz. jar salsa
1 packet taco seasoning
2 cups iceberg lettuce, shredded
2 tomatoes, diced
1 cup shredded cheddar cheese, reduced-fat
Fresh cilantro, chopped

Directions:
In a medium bowl, mix together the cream cheese, sour cream, salsa and taco seasoning with an electric mixer or stand mixer.  On a platter, spread the can of refried beans first in an even layer. Next, spread the cream cheese taco mixture into another even layer.  Top with the shredded lettuce, diced tomatoes and shredded cheese.  Finally, finish off the taco dip with some chopped fresh cilantro!

XOXO Megan

Recipe adapted from Skinnytaste

5.12.2014

Pine Nuts & Parmesan Side Salad

This is such an easy salad to throw together for a side for really ANY meal!  I came up with this simple recipe by just throwing together what I had on hand.  I needed one more side to complete a dinner a few weeks ago and this was the perfect compliment.  I know it sounds and looks really easy, but the flavor combo made for refreshing and light side salad.

Servings: 2 side salads
Serving Size: 1 salad
Points Plus: 3pp
Level of Difficulty: Easy!
Prep Time: 10 minutes
Cook Time: n/a

Ingredients:
Baby greens
1/8 cup pine nuts
2 oz. Parmesan flakes
Salt & pepper to taste
Fresh lemon juice

Directions:
Wash and prepare your greens and plate out into bowls.  Add the pine nuts to a small saute pan and toast on the stove for 3-5 minutes over medium heat.  Top each salad with a sprinkle of pine nuts and 1 oz. parmesan cheese.  Finish with a squeeze of fresh lemon juice and salt & pepper to taste. You can easily add in some veggies to this salad - I think cherry tomatoes would be a great addition!
Tip:
Make sure you keep an eye on the pine nuts!  They can (and will) burn quickly if you aren't paying attention.

XOXO Megan

5.09.2014

Spring Pea Salad w. Goat Cheese and Shallots

I love using fresh veggies when they are in season, but Spring in MN is a bit delayed this year (as we have another cold rainy May day). I love this salad because you can either use fresh peas from the farmers market, or frozen if in a pinch. This salad is quick and full of fresh spring flavors. Use it as a side dish or whole meal this weekend!

Servings: 4
Serving Size: 1/2 cup
Points Plus: 3pp
Prep Time: 5 minutes
Cook Time: n/a
Level of Difficulty: Easy

Ingredients:
2 cups peas, fresh or frozen. If using frozen let them thaw.
4 oz soft goat cheese
2 T fresh mint leaves
1 T capers, chopped
1 small shallot, cut in rings
1 t lemon zest
Kosher salt + black pepper to taste

Directions:
Put peas an a bowl and add remaining ingredients except for cheese.  Carefully stir until combined. Sprinkle goat cheese on top and serve.

Tip:
You could serve this combo on top of a plate of mixed greens for a light and sprin-y lunch!

XOXO - Katie

Recipe adapted from Real Simple


5.08.2014

Blackberry, Granola, Yogurt Parfaits

I don't know about you, but I am always looking for new breakfast ideas!  I seem to get stuck in a rut and end up eating the same thing for breakfast during the week.  Usually this ends up being a granola bar, which can get pretty boring.  I came up with this really simple idea for a fruit and yogrut parfait!  I served this last weekend when my mom was in town for a quick and easy breakfast on Sunday morning.

Servings: 2
Serving Size: 1 parfait
Points Plus: 4pp
Level of Difficulty: SUPER easy!
Prep Time: 5 minutes
Cook Time: n/a

Ingredients:
1 1/2 cups Chobani Simply 100 Greek yogurt, vanilla flavored
1/2 cup Back to Nature Classic granola
Fresh blackberries

Directions:
Wash the blackberries and gently pat dry with a paper towel.  Portion out the yogurt into two bowls.  Each serving should be 3/4 cup.  Top the yogurt with 1/4 cup of granola and finish with a handful of blackberry.  Enjoy!

Tip:
The options you can substitue into this basic partfait are basically unlimited!  Not a fan of blackberries? Choose blueberries or strawberries instead.  You can really mix things up with a different yogurt flavor!

XOXO Megan

5.07.2014

Arugula Salad w. Watermelon & Feta

I am trying to venture out and try new things that I previously haven't enjoyed.  Item #1...fruit in salad!!!  And sweet salad dressing, don't even get me started... I don't know why, but these flavor combos give me the heebie jeebies. But I have heard such great things about the combination of watermelon and feta I decided to try this ridiculously easy salad.  And it was great!  I actually forgot to add the olive oil to the dressing and you know what, it was delish!  No EVOO needed people - which also makes the dressing and recipe very low in pp.

Servings: 4
Serving Size: About 1.5 cups
Points Plus: 3pp
Prep Time: 10 minutes
Cook Time: n/a
Level of Difficulty: Easy

Ingredients:
Salad
3 oz baby arugula, cleaned
3 oz baby spinach, cleaned
2 cups seedless watermelon, cut into small cubes
1/4 cup scallions, both white and green parts
1/4 cup fresh mint, chopped
3 oz low fat feta, crumbled

Dressing
Juice of one orange (about 1/4 cup)
Juice of one lemon (about 1/8 cup)
1 shallot, minced
1 T honey
1 t kosher salt
1/2 t black pepper

Directions:
This is pretty easy people! To make the dressing - add all ingredients to a bowl and wish until everything is evenly blended. Cover and put your dressing in the fridge until you are ready to use.  I use one of these handy pampered chef salad makers, which makes measuring and mixing a breeze!

To make the salad - put all salad in a bowl and toss.

To assemble - either put your dressing over the salad to serve, or serve the dressing on the side allowing each guest to add their desired amount.

Tip:
My dinner guest, Helen :), always suggest buying a brick of feta and crumbling it yourself. The flavor is considerably better!

XOXO - Katie

Salad dressing inspired by this one.

5.06.2014

Mexican Quinoa

Quinoa can be intimidating if you have never cooked with it before.  At least that's how I felt!  But this recipe is SO easy you will be a quinoa cooking pro in no time.  Also, the blend of Mexican ingredients and spices really makes for a flavorful, satisfying dish.

Servings: 4
Serving Size: 1/4 the pan + 1/4 avocado
Level of Difficulty: Easy
Points Plus: 10pp
Prep Time: 10 minutes
Cook Time: 20-25 minutes
  
Ingredients:
1 Tbsp. olive oil
2 tsp. minced garlic
1 jalapeno, diced
1 cup quinoa
1 cup chicken/vegetable broth
1 15 oz. can black beans, drained and rinsed
1 14.5 oz. can fire-roasted diced tomatoes
1 cup frozen corn
1 tsp. chili powder
1/2 tsp. cumin
Salt & pepper to taste
Lime juice (1 lime)
2 Tbsp. fresh cilantro, chopped
1 avocado, diced

Directions:

In a large skillet, heat the olive oil and saute the garlic and jalapeno for 1-2 minutes.  Add in the quinoa, broth, black beans, diced tomatoes, corn, chili powder, cumin and salt & pepper.  Stir until everything is well combined.  Turn the burner to high heat and bring to a boil.  Once boiling, reduce the heat to simmer and cover.  Simmer for 20 minutes or until the qunioa is fully cooked.  Stir in the lime juice and fresh cilantro.  Serve in bowls and place the diced avocado on top.

Tip:
Add a little sprinkle of salt to the top of the avocado pieces to really get the flavor to pop!

XOXO Megan

Adapted from Damn Delicious

5.05.2014

Hungry Girl's Slow Cookin' Mexican Chicken + Baked Chicken Taquitos

Happy 5 de Mayo everyone! Here is a tasty Mexican inspired recipe for you. Do you ever whip up a crock pot recipe, plug it in, leave for the day and constantly worry that it is going to start your house on fire?  In the olden days I used to worry causing me to only use my crock pot on the weekends.  And usually on those weekend crock pot days I would get impatient and eat my crock pot meal before it was really ready because it smelled amazing (of course, after it was cooked through but maybe not cooked to it's full potential).  Anyways, after doing some online research I decided to just cook my crock pot recipe at night, on low, for 8ish hours, and then transfer it to a glass container in the morning and refrigerate all day. Which brings me to this tasty recipe!  It is actually a two part-er.  First you make the crock pot chicken and THEN you use the chicken to make crispy crunchy oven baked Taquitos.  Or you could put the chicken on a salad.  Or use the chicken in regular soft shell tacos.  Or just eat the chicken plain like I did right out of the crock!  You get the idea...

Servings: This recipe is for 8 Taquitos, but you will have plenty of leftover crock pot chicken to use as you wish
Serving Size: 4 Taquitos
Points Plus: Chicken - 3pp per 1/2 cup, Taquitos - 8pp
Prep Time: Chicken - 1 minute, Taquitos - 10 minutes
Cook Time: Chicken - 8 hours, Taquitos - 20-25 minutes
Level of Difficulty: Medium

Ingredients
Hungry Girl's Slow Cookin' Mexican Chicken
1 cup canned crushed tomatoes
1/2 cup jarred roasted red peppers
1/4 cup diced green chilies
1 T dry taco seasoning (OR you could make your own like I did)
1/2 T garlic powder
1/4 t. crushed red pepper flakes
1/8 t black pepper
1 1/2 lb chicken breasts
1/8 t kosher salt or more to taste

Baked Taquitos
1 cup of Hungry Girl's Slow Cookin' Mexican Chicken
8 small corn tortillas, I like Trader Joes brand
1/4 cup fresh cilantro or parsley
1/2 cup salsa
2 T light sour cream
8 t reduced fat cheese
1 t olive oil
Cooking spray

Directions
Crock Pot Chicken
Put all Crock Pot Chicken ingredients in the crock. Mix around and cook for 3-4 hours on low OR 8 hours on high. If you are a wussy like me cook it while you sleep! After the chicken is finished cooking use the back of a wooden spoon to shred it.  Or, if you are crazy and like to do dishes, transfer it to your kitchen aid, attach your paddle and whip it until it has shredded.

Baked Taquitos
Preheat your oven to 400 degrees and spray a baking pan with cooking spray. Wet a paper towel, and place corn tortillas between the wet paper towel and microwave for 1 minute.  Do this in batches, 2 tortillas as a time.  This will prevent the tortillas from cracking as you roll them and you do not want to skip this step.

Lay tortillas out on your counter, and put 2 T of shredded chicken in a line at the bottom of the tortilla (not in the center). Add 1 t of cheese over chicken and starting at the end closest to the chicken, roll the Taquito tightly like a cigar.  Place the rolled taquito on your prepared baking dish seam-side-down.  This will prevent the taquito from unrolling in the oven.  Repeat this step with all 8 tortillas. Put your 1 t of olive oil in a small bowl, and using a silicon brush, brush the top side of all of the taquitos, will help them crisp up in the oven.

Place your baking dish in the oven for about 10 minutes.  After 10 minutes flip the taquitos and bake another 10-15 minutes until crunchy!

Serve with salsa, sour cream and cilantro (or parsley). Enjoy!

Tip
You could use any type of meat inside of these crunchy tortillas, or even do a roasted veggie version!

XOXO - Katie

Chicken recipe for Hungry Girl's 1-2-3 Cookbook.

5.02.2014

Creamy Lemon Tortellini

Here is a great weekend meal.  A bit of an indulgence yet healthy and satisfying in moderation all rolled into one. I have been cooking a lot more with lemon and lemon zest which I LOVE! This recipe also makes tasty leftovers!

Servings: 6
Serving Size: 1 cup
Points Plus: 8pp
Prep Time: 10 minutes
Cook Time: 15 minutes
Level of Difficulty: Moderate

Ingredients:
12 oz package of frozen Cheese Tortellini
2 slices bacon
1 t olive oil
3 garlic cloves, minced
2 T flour
2 c skim milk
¾ t salt
1/8 t black pepper
1 ½ t dried basil
¼ t crushed red pepper flakes
1 T freshly squeezed lemon juice
2 t lemon zest
2 c fresh spinach, loose, not packed
1 ½ oz Parmesan cheese, freshly grated
2/3 part skim shredded Mozzarella cheese

Directions:
Pre-heat your oven to 350 degrees. Bring a pot of lightly salted water to a boil and cook tortellini according to package directions, only a few minutes.

Cut your bacon into small pieces and sauté in a non-stick pan until crispy - about 8 minutes. Remove bacon from your pan and wipe out grease. Add 1 t olive oil to your skillet and sauté garlic for about a minute, and then add your flour to the pan and whisk into the garlic for about a minute. Add your milk while still whisking, and stir until there are no floury lumps. Add salt, pepper, basil and red pepper flakes (remember to make sure the whole container doesn't dump into your sauce) and bring sauce to a simmer.

When the sauce begins to boil add lemon juice and lemon zest.  Saute until sauce thickens up, on medium heat. Make sure it doesn't start to burn!

When tortellini is done drain it, rinse it and return it to the pan! Add the bacon, both cheeses and sauce mixture and stir until combined and spinach is wilted. Enjoy!

Tip:
This recipe could easily be vegetarian by omitting the bacon OR, you could add broccoli and sautéed peppers for a pasta primavera style dish!

XOXO - Katie

Recipe adapted from Emily Bites.

5.01.2014

Asparagus, Bacon & Egg Salad

Do you need a new spring salad??  Check out this asparagus based salad.  I think it's really fun that the salad uses just asparagus as the greens instead of any type of lettuce.  Definitely a twist on the classic dinner salad!
 
Servings: 2
Serving Size: 1 salad (1/2 the recipe) 
Points Plus: 6pp
Level of Difficulty: Easy
Prep Time:  10 minutes
Cook Time: 5 minutes

Ingredients:
Salad-
2 hard boiled eggs
3 1/2 cups asparagus
4 slices bacon

Dressing-
1 tsp. Dijon mustard
2 tsp. olive oil
2 tsp. red wine vinegar
Salt & pepper to taste

Directions:
Bring a medium saucepan full of water to a boil and add the asparagus to cook for about 3 minutes.  Drain and immediately rinse with cold water to stop the cooking process and make sure the asparagus stays crisp.  While the aspragus is cooking, in a seperate pan cook 4 slices of bacon.  Once the bacon is finished cooking and slightly cooled, dice into small pieces.  In a glass measuring cup, combine the Dijon mustard, olive oil, red wine vinegar and salt & pepper with a small whisk to make the Dijon dressing.  Slice the hard boiled eggs in an egg slicer.  In a large bowl, combine the asparagus, bacon and egg slices. Toss the salad with the Dijon vinaigrette dressing and serve immediately!  
Tip:
A great time saver is to make a batch of hard boiled eggs on Sundays - you can keep them in the fridge for the week and use in salads or just pack one in your lunch for some extra protein!

XOXO Megan

Recipe adapated from Skinnytaste